• Capture a Synology Package during installation

    This is an update of a previous post on this topic.

    I noticed that since a recent update of DSM, my previous script was not working fine anymore, when trying to capture a spk during installation. So here is an improved version.

    Click to Read More

    [code language=”bash”]

    #!/bin/bash
    VOLUME=$1
    TARGET=$2

    #Copy also the expanded package ?
    COPYEXPAND=false

    if [ -z "$VOLUME" ]; then
    echo "usage: capture <source VOLUME> <target dir>"
    exit 0
    fi

    if [ -z "$TARGET" ]; then
    echo "usage: capture <source VOLUME> <target dir>"
    exit 0
    fi

    pattern="volume[0-9]+"
    if [[ ! $VOLUME =~ $pattern ]]; then
    echo "The name of the source volume must be like ‘volume<i>’ where <i> is numeric"
    exit 0
    fi

    if [ ! -d "/$VOLUME/@tmp" ]; then
    echo "Temporary dir not found: /$VOLUME/@tmp"
    exit 0
    fi

    if [ -d "/$VOLUME/@tmp/SynoCapture" ]; then
    rm -R "/$VOLUME/@tmp/SynoCapture"
    fi

    if [ -d "/$VOLUME/@tmp/@synopkg" ]; then
    rm -R "/$VOLUME/@tmp/@synopkg"
    fi

    echo "Press any key to stop the capture"

    if [ -t 0 ]; then stty -echo -icanon -icrnl time 0 min 0; fi

    count=0
    keypress=”
    echo "Going to copy the packages into $TARGET/SynoCapture"

    if [ ! -d "$TARGET/SynoCapture" ]; then
    mkdir "$TARGET/SynoCapture"
    fi

    while [ "x$keypress" = "x" ]; do
    if [ -d "/$VOLUME/@tmp/@synopkg/@download/" ]; then
    cp -nlR "/$VOLUME/@tmp/@synopkg/@download/." "/$VOLUME/@tmp/SynoCapture/"
    fi

    if [ "$COPYEXPAND" = true ]; then
    if [ -d "/$VOLUME/@tmp/pkginstall/" ]; then
    cp -nlR "/$VOLUME/@tmp/pkginstall/." "/$VOLUME/@tmp/SynoCapture/pkginstall/"
    fi
    fi
    let count+=1
    echo -ne $count’\r’
    keypress="`cat -v`"
    done

    if [ -t 0 ]; then stty sane; fi

    find "/$VOLUME/@tmp/SynoCapture/" -type f -name ‘@SYNOPKG_DOWNLOAD_*’ -exec sh -c ‘x="{}"; mv "$x" "${x}.spk"’ \;
    if [ "$COPYEXPAND" = true ]; then
    if [ -d "$TARGET/SynoCapture/pkginstall" ]; then
    rm -R "$TARGET/SynoCapture/pkginstall"
    fi
    fi
    cp -fR "/$VOLUME/@tmp/SynoCapture" "$TARGET/"
    rm -R "/$VOLUME/@tmp/SynoCapture"

    echo "$count captures done"
    exit 0

    [/code]

    Now the script will copy only the SPK file into the specified target folder. It’s also possible to copy the expanded version by setting the variable COPYEXPAND=true

    Also, now, I don’t find anymore a folder name “pkglist.tmp” containing files synoserver.enu and otherserver.enu. Those files used to contain the URL’s of all SPK available respectively on the official Synology website and on the various SPK servers that you configured in your Package Center > Settings > Package Sources.

    To make the capture even easier, I have create a Package named “MODS Package Capture, available on my SPK Server and published on GitHub.

    Loading

  • Can’t install/uninstall/repair Synology Virtual Machine Manager – Upgrade DSM not possible

    I was unable to upgrade my DSM from 6.1.7 to 6.2.1 because it was pretending to be member of a Virtual Machine Manager cluster. Which was not correct as Virtual Machine Manager was not installed ‘anymore’.

    Click to Read More

    I used to test the beta version of Virtual Machine Manager a long time ago. But since a while, Virtual Machine Manager is not installed anymore on my Synology and it was clearly visible neither in the DSM menu nor in the Package Center.

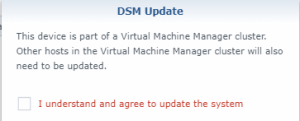
    Unfortunately, for some unknown reasons, my DSM thought that it was still part of Virtual Machine Manager cluster. As a consequence I was getting the following warning when upgrading my DSM: “This device is part of a Virtual Machine Manager cluster. Other hosts in the Virtual Machine Manager cluster will also need to be updated“.

    Trying to upgrade was always failing (without breaking my DSM, fortunately).

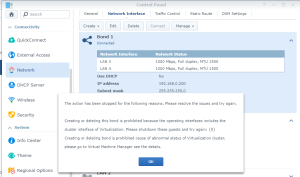
    I initially thought it could possibly be due to the network Bond I did create. So I tried to remove it via Control Panel > Network. But it failed with the message : “Creating or deleting this bond is prohibited because the operating interfaces includes the cluster interface of Virtualization. Please shutdown these quests and try again: {0}. Creating or deleting the bond is prohibited because of abnormal status of Virtualization cluster, please go to Virtual Machine Manager see the details.”

    Based on this message, and since it was not installed anymore, I tried to reinstall the Virtual Machine Manager. Unfortunately, the installation was failing and the package was stuck in a “repair” status.

    Being unable to ‘repair’ it by clicking on the “Repair” button, I tried to uninstall it. This was also failing, with the following message: “You cannot remove this package because this Synology NAS is a part of a Virtual Machine Manager Cluster. Please remove the host from the cluster to proceed.”

    Argh !!!

    Bref… I tried to ‘erase’ the package using my own Package Manager (See my SSPK server). It’s doing something similar to the trick explained here to delete all files related to the ‘Virtualization’ package.

    Once the package fully erased, I did reinstall it again but still without any success… And again it was stuck in a “repair” status and I was unable to uninstall it properly.


    As I couldn’t find any config file where I could see that my NAS was a member of a Virtual Machine Manager cluster, I tried to fix myself the installation of the package. I couldn’t really fix it (I couldn’t see which step of which installation or upgrade script was failing). But I have been able to force the installation to complete by deleting the file ‘/var/packages/Virtualization/installing’.

    Next, the package Virtual Machine Manager appeared in status ‘Installed’ but ‘stopped’. I was however able to “Start” it without any problem !! I could see in this Manager that my NAS indeed used to be configured as a member of cluster.

    And, miracle (even without deleting the cluster), running now the upgrade of my DSM finally succeeded !!!

    After the upgrade, I did remove my NAS from the cluster.

    Et voilà.

    [PS] I did use the Virtual Machine Manager a long time ago to test how Windows was running in a VM. It was a bit too slow for me so I did remove the Virtual Machine Manager. Probably that the cluster was not deleted at that time. Hence all the problems here above.

    [Edit] Once the DSM upgraded, I did delete the Virtual Machine Manager cluster. But as a consequence, I did lost all connections onto the NAS (ftp, web, plex, ssh, …). I was only able to see the NAS using the Synology Assistant. TO solve the problem I did shutdown the NAS by pressing the power button for a long period. After the reboot, everything as working fine. No, starting the Virtual Machine Manager, it starts a wizard to create a new cluster.

    Loading

  • Search for file on Linux using grep and find

    Search for files containing a certain text, on my Synology, ignoring warnings like ‘ Permission denied’

    Click to Read More

    Just a note for myself… as I always forgot the syntax :/

    Using grep only

    grep -rnlw ‘/path/to/somewhere/’ -e ‘pattern’ 2>/dev/null

    grep -rnlw ‘text’ ‘/path/to/somewhere/’ 2>/dev/null

    • -r or -R is recursive,
    • -n is line number, and
    • -w stands for match the whole word.
    • -l (lower-case L) can be added to just give the file name of matching files.

    Using find

    find ‘/path/to/somewhere/’ -type f -exec grep “text” ‘{}’ \; -print

    Loading

  • Find and kill all tasks running for a service/package on a Synology

    I wanted to kill all tasks running on my Synology for a package before uninstalling this one. Here is the how-to:

    Click to Read More

    The tasks running for a service are all listed in /sys/fs/cgroup/cpuacct/[the service]/tasks

    The service can be pgsql, nginx, nmbd, ftpd, sshd, … or synotifyd, synologd, synobackupd, … or a package like pkgctl-CloudSync, pkgctl-AudioStation, pkgctl-SurveilanceStation, …

    Ex.:

    • To see all tasks running for Synology’s StorageAnalyzer, type something like: cat /sys/fs/cgroup/cpuacct/pkgctl-StorageAnalyzer/tasks
    • To kill all those tasks, type something like: for task in $(cat /sys/fs/cgroup/cpuacct/pkgctl-StorageAnalyzer/tasks); do kill $task; done

    Loading

  • License and installation wizard not shown when installing Synology Package

    I noticed this morning that my Synology is not showing the License and the Installation Wizard anymore when installing my own Packages (Packages made with my app MODS and hosted on my own SSPK Server).

    Click to Read More

    I am not yet able to understand why the Installation Wizards and the Licence file of my own packages are not shown anymore, when installing them from my SSPK server via “Package Center” > “Community”. But everything works fine when installing them “Manually” via “Package Center” > “Manual Install” (and browsing to pick the spk into the folder of my SSPK server).

    The Upgrade Wizards and even the “Confirm settings” screen are also not displayed… While the Uninstallation Wizard works fine in all cases ?!

    My DS1815+ is running DSM 6.1.7-15284.

    I have compared all the logs created in /var/log/ during the installation and noticed a few differences. First, when installing a package from my SSPK server, there are ‘messages’ being logged:

    2018-11-03T22:26:05+01:00 … synoscgi_SYNO.Core.Package.Installation_1_install[21663]: resource_api.cpp:163 Acquire service-cfg for [the package I am installing] when 0x0001 (done)

    This is logged each time I am installing a package from my SSPK Server but not when install the same package manually.

    Next to those messages, the following INFO are also logged in synofeasibilitycheck.log:

    2018-11-03T22:25:50+01:00 … synoscgi_SYNO.Core.Package_1_feasibility_check[21529]: feasibility_check.cpp:87 FeasibilityCheck: [Info] Start feasibility check [package_install] with type [hard].
    2018-11-03T22:25:50+01:00 … synoscgi_SYNO.Core.Package_1_feasibility_check[21529]: feasibility_check.cpp:106 FeasibilityCheck: [Info] [0] of feasibility check [package_install] failed.
    2018-11-03T22:25:50+01:00 … synoscgi_SYNO.Core.Package_1_feasibility_check[21529]: feasibility_check.cpp:79 FeasibilityCheck: [Info] No [package_install] feasibility check config with type [soft].


    Loading

  • Call a php webpage from a IFTTT applet using Google Assistant

    I wanted to be able to wake up PC on my Lan using voice commands. To achieve that, I did implement a solution using Google Assistant, IFTTT and a php web page hosted on my NAS.

    Click to Read More

    Regarding IFTTT, you must have an account. Then,

    • Create a new applet,
    • Choose the service “Google Assistant”
      • Choose a trigger, ex.: “Say a phrase with a text ingredient”
      • Type a phrase in “What do you want to say?” such as “Wake up my PC $” ($ is the symbol to be used for the “ingredient”)
      • Type a phrase in “What do you want the Assistant to say in response?” such as “Ok, I will wake up $”
    • Choose next an action service “Webhooks” (to “make a web request”)
      • Type the url of your web page: http://<public Ip of your NAS>/<some path>/action.php?do=wakeup&param={{TextField}} ({{TextField}} will take the value of the ingredient)
      • Chose the “method”: GET
      • Chose the “content type”: text/plain

    Regarding the php web page (action.php), I had to do some fine tuning… So, I started with a page logging all information received from IFTTT:

    [php]</pre>
    <?php
    // https://gist.github.com/magnetikonline/650e30e485c0f91f2f40
    class DumpHTTPRequestToFile
    {
    public function execute($targetFile)
    {
    $boby = json_decode(file_get_contents(‘php://input’) , true);

    $data = sprintf("<h2><u>IFTTT call at %s on %s</u></h2><h3>Method:</h3>", date(‘h:i:s’) , date(‘d/m/Y’));
    $data .= sprintf("<blockquote>%s (%s): %s </blockquote><h3>HTTP headers:</h3><ul>", $_SERVER[‘REQUEST_METHOD’], $_SERVER[‘SERVER_PROTOCOL’], htmlentities($_SERVER[‘REQUEST_URI’]));
    foreach ($this->getHeaderList() as $name => $value)
    {
    $data .= "<li><b>" . $name . ‘</b>: ‘ . $value . "</li>";
    }

    $data .= "</ul><h3>Post:</h3><ul>";
    foreach ($_POST as $key => $value) $data .= "<li>" . $key . ‘=’ . $value . ‘</li>’;

    $bodyhtml = $this->jsonToTable($boby);
    $data .= "</ul><h3>Request body:</h3><blockquote>$bodyhtml</blockquote>";

    $action = trim(strtolower($_GET[‘action’]));
    $action = preg_replace(‘/^ *de +/’, ”, $action);
    $action = preg_replace(‘/^ *d *\’ +/’, ”, $action);

    $param = trim(strtolower($_GET[‘param’]));
    $param = preg_replace(‘/^ *de +/’, ”, $param);
    $param = preg_replace(‘/^ *d *\’ +/’, ”, $param);

    $data .= "<h3>Requested Action:</h3><blockquote>$action: $param</blockquote>";

    similar_text(strtolower($param) , "zeus", $percent);
    $data .= "Zeus: $percent %<br>";

    similar_text(strtolower($param) , "chaos", $percent);
    $data .= "Chaos: $percent %<br>";

    file_put_contents($targetFile, $data . file_get_contents($targetFile) . "\n");

    echo (nl2br($data));
    }

    private function getHeaderList()
    {
    $headerList = [];
    foreach ($_SERVER as $name => $value)
    {
    if (preg_match(‘/^HTTP_/’, $name))
    {
    // convert HTTP_HEADER_NAME to Header-Name
    $name = strtr(substr($name, 5) , ‘_’, ‘ ‘);
    $name = ucwords(strtolower($name));
    $name = strtr($name, ‘ ‘, ‘-‘);
    // add to list
    $headerList[$name] = $value;
    }
    }
    return $headerList;
    }

    private function jsonToTable($data)
    {
    $table = "<table class=’json-table’ width=’100%’>";
    foreach ($data as $key => $value)
    {
    $table .= "<tr valign=’top’>";
    if (!is_numeric($key))
    {
    $table .= "
    <td>
    <strong>" . $key . ":</strong>
    </td>
    <td>
    ";
    }
    else
    {
    $table .= "
    <td colspan=’2′>
    ";
    }
    if (is_object($value) || is_array($value))
    {
    $table .= jsonToTable($value);
    }
    else
    {
    $table .= $value;
    }
    $table .= "
    </td>
    </tr>
    ";
    }
    $table .= "</table>";
    return $table;
    }
    }

    (new DumpHTTPRequestToFile)->execute(‘./action.html’);

    ?>
    <pre>[/php]

    The log is stored in a html page “log.html”.

    Notes:

    • I notice that Google was not good at recognizing the name of my PC (IMO because I use French sentences). So I am using a php command “similar_text” to evaluate the “ingredient”. But this is really far from effective.
    • I tried to use a “POST” method instead of “Get” and a Content Type “application/json”, it works. But when I add a Body like {“token”:”mseries”,”command”: “<<<{{TextField}}>>>”, ”test”: “data”}, I don’t see it received by my php page 🙁
    • If Google Assistant does not call correcly IFTTT, look at you voice command history to be sure it understood you order: https://myactivity.google.com/myactivity?restrict=vaa&utm_source=help
    • If Google Assistant understood correctly your command, but IFTTT didn’t call your web page, look at your IFTTT activity: https://ifttt.com/activity

    A log for a call using a GET method will look like:

    IFTTT call at 11:32:29 on 25/09/2018

    Method: GET (HTTP/1.1): /ifttt/action.php?action=wakeup&param=CARROS

    HTTP headers:

    X-Newrelic-Transaction: PxQGUlECCwFRBVEEVQAAAlQTGlUDChAHHEAJVA1cAgMKA1gEVFNVUVUHFU1EAQACBV1UBlUTag==
    X-Newrelic-Id: VwAOU1RRGwAFUFZUAwQE
    Content-Type: text/plain
    Content-Length: 74
    Connection: close
    Host: olympe.letroye.be
    X-Real-Port: 55748
    X-Port: 80
    X-Real-Ip: 54.164.110.125
    X-Forwarded-By: 192.168.0.200

    Post:

    Request body:

    Requested Action: wakeup: CARROS

    Zeus: 20 %
    Chaos: 72.727272727273 %

    A log for a call using a POST method with application/json content-type will look like:

    IFTTT call at 11:41:14 on 25/09/2018

    Method: POST (HTTP/1.1): /ifttt/action.php?action=wakeup&param=Kaos

    HTTP headers:

    X-Newrelic-Id: VwAOU1RRGwAFUFZUAwQE
    Content-Type: application/json
    Content-Length: 77
    Connection: close
    Host: olympe.letroye.be
    X-Real-Port: 59892
    X-Port: 80
    X-Real-Ip: 54.211.16.53
    X-Forwarded-By: 192.168.0.200

    Post:

    Request body:

    Requested Action: wakeup: kaos

    Zeus: 25 %
    Chaos: 66.666666666667 %

    Loading

  • How to backup Photo from a mobile onto a Synology

    I used to rely on DS Cloud to backup my complete Android mobile onto my Synology (both internal and external storage). But after Android 4.4.x, the files must be stored under /storage/<your external sd>/Andoid/data/com.synology.dsclooud/files. It means DS Cloud may not backup the DCIM folder locate on the external SD.

    The solution is to get rid of DS cloud and use DS File or DS Photo – or a third party, but this a less preferred option for me…

    Click to Read More

    DS Photo

    It has a feature to backup all photos from a mobile (Android or iOS) into one folder/album of the Photo Station. But it means that Photo Station must be installed.

    See documentation here (loo for Upload and Download Photos).

    It’s really slow because it needs to create the thumbnails, etc… for Photo Station and seems even to stop from time to time. You have to open it to check that it runs effectively.

    Pay attention to not check the option that frees space. It will deleted the photos on your mobile after the upload.

    NB.: It also backup movies (“You can upload photos or videos from …“), but does not seem to do it as long as all photos are not yet uploaded. Many old videos were not yet uploaded onto my Synology although photos with the same age were already processed. And after the backup of 1000th of photos, I finally saw a long list of videos being uploaded.

    DS File

    It has a feature to backup all photos and videos into any subfolder of a shared drive. As far as I am concerned, I do backup into a subfolder of my “home” on the Synology.

    See documentation here (look for Backing up Photos and Videos).

    Pay attention to not check the option that frees space. It will deleted the photos and movies on your mobile after the backup.

    DS File can backup photos and videos from all detected locations containing media: DCIM (external storage), Office Lens, PhotosEditor, WhatsApp Images, WhatsApp Video. But you may not specify yourself a custom folder. It’s nevertheless the best option to backup all media in my opinion.

    Attention, I noticed that DS File consumed a lot of power during the first backup, so it was suggested to be put in deep sleep mode. But doing that stops the backup background process. Compared to DS Photo, it’s quite exactly the same behavior and configuration but one can chose the target folder on the Synology. Also, it is much faster (as it does not have to create anything for the Photo Station) and backup all videos and photos simultaneously.

    Moment

    There is now a new application, named Synology Moment, which also comes with a Backup feature for photos and videos, similar to Photo Station. I didn’t test it yet.

    (Synology Moment is combined with Synology Drive, an application replacing Cloud Station Server)

    Loading

  • Solve a 504 Gateway Time out nginx with WordPress on Synology

    Recently, accessing WordPress on my Synology started to result in “504 Gateway Time out nginx” errors.

    I found the solution here.

    Click to Read More

    1. Open a ssh console using Putty as explained here.
    2. Enter root mode by typing: sudo -i
    3. cd /etc/nginx/
    4. chown -hR http:http conf.d/
    5. cd conf.d
    6. vi www.WordPress.conf
      1. Add: proxy_connect_timeout 600;
      2. Modify: proxy_read_timeout 600;

    Loading

  • Acronis cannot access backup file due to credentials of network share

    Trying to backup an image of my PC with Acronis True Image 2016 on my Synology, I got an error message like “Acronis cannot access backup file [due] to credentials [when accessing the] network share”.

    I couldn’t find the way to change those credentials… But finally found a trick (?) to be prompted!

    Click to Read More

    Concretely,

    • after adding a new backup, I clicked “Select Destination” and used the ‘Browse…’ option to “Set a custom location for the backup”.
    • Next, I picked “My NAS connections” where my Synology was already listed (configured more than 2 years ago) and there, browsed to a sub-folder on the “home” share.
    • Unfortunately, clicking on “Back up Now” resulted, after longs minutes, into an error message complaining about the credentials.

    Probably because Acronis is using the Windows Credential Manager, I couldn’t find how to change the credentials within Acronis.

    But changing again the destination and typing manually the path “\\<MyNAs>\\home\Acronis\<PC Name>” instead for Browsing for that folder, I was prompted for a login/password.

    Acronis Credentials Network

    Et voilà…

    Loading

  • Cannot login into Somfy website with my email address

    Come on Somfy’s guys… I failed to login into your Somfy Tahoma Website because of a stupid “Case” coding !

    Click to Read More

    I did create an account on Somfy Connect Website as I always do on all websites; with the first letters in uppercase for my first-name and surname.

    But on Somfy Tahoma Website, I couldn’t login with that account. I lost long minutes to figure out that on this second website, I had to type my email in lower case!!!

    Beginners !

    Loading

Tags


Acer iDea 510 AirPlay Android Backup DD-WRT DNS DS209+ DS713+ DS1815+ FlexRaid Galaxy Galaxy S2 Galaxy S7 Google Assistant Google Home HTPC Kies MCE MySQL Nabi 2 Nvidia TV Shield One Plus One OpenHab Outlook Philips Hue Plex RAID Raspberry PI Remote Desktop Root Access Samsung Scripts Synology Team Build Visual Studio VMWare Wi-Fi Windows Windows 8 Windows 8.1 Windows 10 Windows Server 2012 XBMC Xpenology ZigBee

Categories


Archives