• Cannot use inventory in Vivecraft

    My daughter suddenly couldn’t use the inventory anymore in Vivecraft, once opened. She couldn’t pick or move items in there. The cause was that Vivecraft’s window was not active on the PC at that moment.

    Click to Read More

    Vivecraft is a mod that turns Minecraft into an exceptional VR experience. Concretely, I use it to run the game from SteamVR and play with it using my HTC Vive pro setup (Be sure to setup and run the game as explained here. Launching the game from the VR Room or Steam does not work).

    When my daughter experienced her issue with the inventory, I was working on the PC at the same time. Vivecraft works indeed fine if someone else is using the PC, as long as you don’t need the mouse to interact with the game. And this is the case  when you want to use the inventory or use some menus.

    Concretely, on the screenshot here under, the cursor + will only appear if, on the PC, the window of the game is activated. I.e.: if you clicked on it with the mouse or used Alt-Tab to give it the focus.

    Vivecraft inventory
    Vivecraft inventory

    So, each time my daughter want to use the inventory, I temporarily give the focus to the window of ViveCraft by switching to it with Alt -Tab. I can next continue to work…

    Et voilà.

    Loading

  • OpenHab: ServiceLocatorImpl has been shut down

    I found a weird error by accident in the openhab.log of my Synology. It was due to the “Localisation” not configured properly in openHab’s System.

    Click to Read More

    I found that error after stopping and starting manually openHab from a SSH console opened on my Synology to solve another issue.

    To stop openHab installed on a Synology as explained here, via a SSH console run as root (as explained here), execute:

    • cd /var/packages/openHAB/target
    • ./runtime/bin/stop

    To restart openHab later execute:

    • ./runtime/bin/start

    NB.: if you execute this command soon after the stop, it won’t work. You can simply re-execute the command a second time.

    Here are more details about the error that I found in the log (located into \\<YourNas>\SmartHome\openHAB\userdata\logs\openhab.log)

    javax.servlet.ServletException: javax.servlet.ServletException: A MultiException has 1 exceptions. They are:
    1. java.lang.IllegalStateException: ServiceLocatorImpl(__HK2_Generated_2,3,718060201) has been shut down

    at org.ops4j.pax.web.service.jetty.internal.JettyServerHandlerCollection.handle(JettyServerHandlerCollection.java:88) ~[bundleFile:?]
    at org.eclipse.jetty.server.handler.HandlerWrapper.handle(HandlerWrapper.java:127) ~[bundleFile:9.4.20.v20190813]
    at org.eclipse.jetty.server.Server.handle(Server.java:494) ~[bundleFile:9.4.20.v20190813]
    at org.eclipse.jetty.server.HttpChannel.handle(HttpChannel.java:374) [bundleFile:9.4.20.v20190813]
    at org.eclipse.jetty.server.HttpConnection.onFillable(HttpConnection.java:268) [bundleFile:9.4.20.v20190813]
    at org.eclipse.jetty.io.AbstractConnection$ReadCallback.succeeded(AbstractConnection.java:311) [bundleFile:9.4.20.v20190813]
    at org.eclipse.jetty.io.FillInterest.fillable(FillInterest.java:103) [bundleFile:9.4.20.v20190813]
    at org.eclipse.jetty.io.ChannelEndPoint$2.run(ChannelEndPoint.java:117) [bundleFile:9.4.20.v20190813]
    at org.eclipse.jetty.util.thread.strategy.EatWhatYouKill.runTask(EatWhatYouKill.java:336) [bundleFile:9.4.20.v20190813]
    at org.eclipse.jetty.util.thread.strategy.EatWhatYouKill.doProduce(EatWhatYouKill.java:313) [bundleFile:9.4.20.v20190813]
    at org.eclipse.jetty.util.thread.strategy.EatWhatYouKill.tryProduce(EatWhatYouKill.java:171) [bundleFile:9.4.20.v20190813]
    at org.eclipse.jetty.util.thread.strategy.EatWhatYouKill.run(EatWhatYouKill.java:129) [bundleFile:9.4.20.v20190813]
    at org.eclipse.jetty.util.thread.ReservedThreadExecutor$ReservedThread.run(ReservedThreadExecutor.java:367) [bundleFile:9.4.20.v20190813]
    at org.eclipse.jetty.util.thread.QueuedThreadPool.runJob(QueuedThreadPool.java:782) [bundleFile:9.4.20.v20190813]
    at org.eclipse.jetty.util.thread.QueuedThreadPool$Runner.run(QueuedThreadPool.java:918) [bundleFile:9.4.20.v20190813]
    at java.lang.Thread.run(Thread.java:748) [?:1.8.0_131]

    This error appears because the location is not set in OpenHAB and your browser probably didn’t have the permission to pass its own location to openhab.

    The issue can be resolved by manually via the PaperUI > Configuration > System > Regional Settings.  There, define your language, your country/region, your Time Zone and your location (with a latitude and longitude – or – by moving the openHab pin onto your location).

    Loading

  • Troubleshoot Z-Wave Controller used by OpenHab

    After reinstalling openHab on a new Synology, I had some ‘Unknown’ Z-Wave devices. The only way to et rid of them was to use “Z-Wave PC Controller” from  Silabs (previously named “Zensys tool”).

    Click to Read More

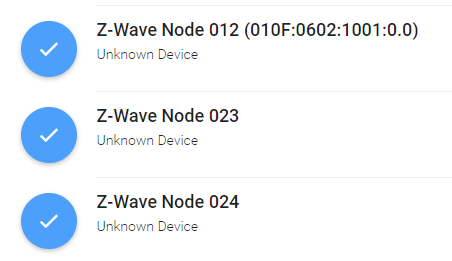
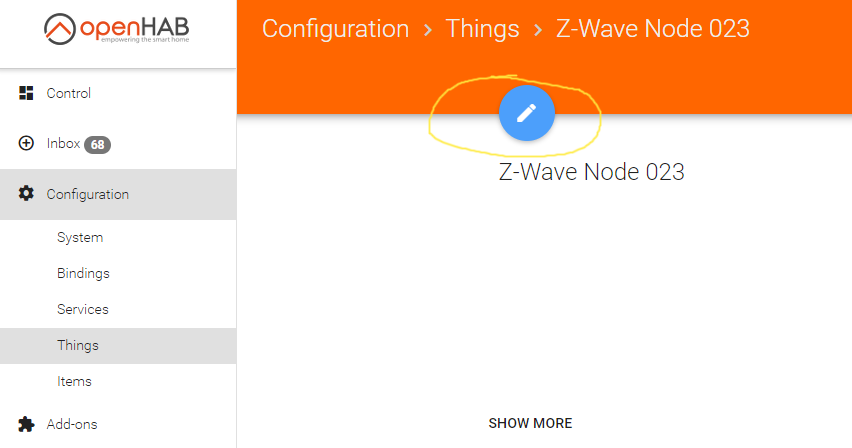
    This is what was displayed in the Paper UI of openHab:

    To solve this, I had two options:

    The first option was to use the PaperUI’s features of openHab to heal, reinitialize the device or remove the device.

    The other option was to remove my Z-Wave Controller from my Synology, and plug in into a PC to clean it using Z-Wave PC Controller.

    Use PaperUI’s feature

    Select your device via the PaperUI > Configurations > Things, click on the “Edit icon” (The pen in a blue disc) and scroll to click on the “Show More” link :

    There, you have access to the various features :

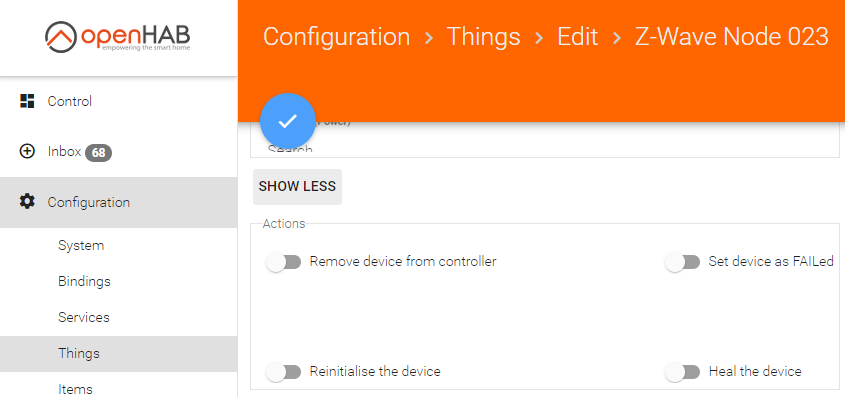
    Try those two actions:

    • “Heal the device” (See here) : it can be useful when the Z-Wave mesh is messed up and nodes become ‘lost’.
    • “Reinitialise the device” : it does not hurt 😉

    Wait next for a few minutes and refresh your PaperUI to check if the device is know fully recognized. 

    Also check if there are any errors in the logs of openHab: events.log and openhab.log. If you installed openHab on your Synology as explained here, those logs are under the Shared Folder \\<YourNas>\SmartHome\openHAB\userdata\logs\

    Install Z-Wave PC Controller

    The download this software I had to find a “valid” Silabs account. Indeed, standard accounts have no access to the download section. Searching for “Silabs.com” on http://bugmenot.com, we find easily such “valid” account.

    Once authenticated on Silbas.com, go to the Z-wave page here, and go to the “PC Programmer” section and click on Download Z-Wave Programmer

    On the next page, click on the Download button in the upper-right corner (If it is not accessible anymore, find the msi in the attachement section of this post).

    Unzip the archive and install the “PC Controller” (/bin/ZWaveControllerSetup.msi)

    Clean-up your Z-Wave Controller

    Now, plug your Z-Wave controller in your PC and open “PC Controller”:

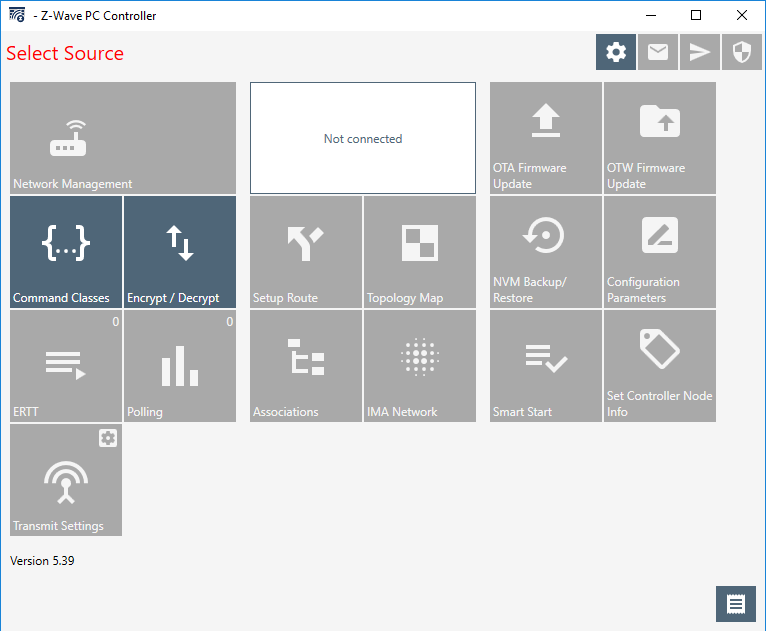
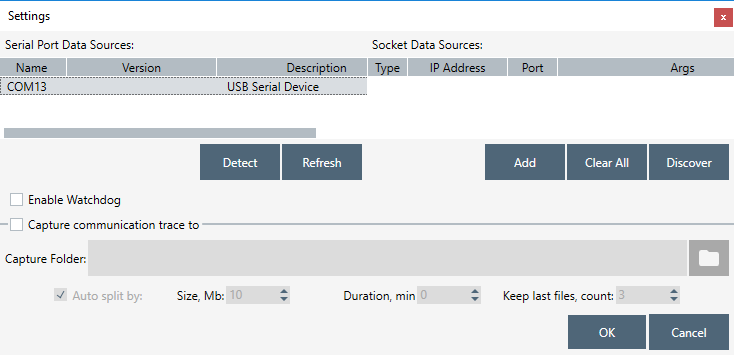
    Click on the Gear icon in the upper-right corner to configure the software to use your Z-Wave Controller. You should see it in the pane “Serial Port Data Sources”. Select it and click on “Ok” at the bottom-right:

    Now, you have access to all the “data” (Z-Wave devices) configured previously on your controller. Here under, you can see that I have 13 nodes available:

    To check which nodes are not yet available, Click on the top-left tail “Network Management”. This will show you a list of all configured nodes. For each node, one by one, select it and press on “Is Failed”. If the node cannot be accessed, it will be marked in red (See the nodes 23 and 24 here under). You can then remove it by clicking on “Remove Failed”.

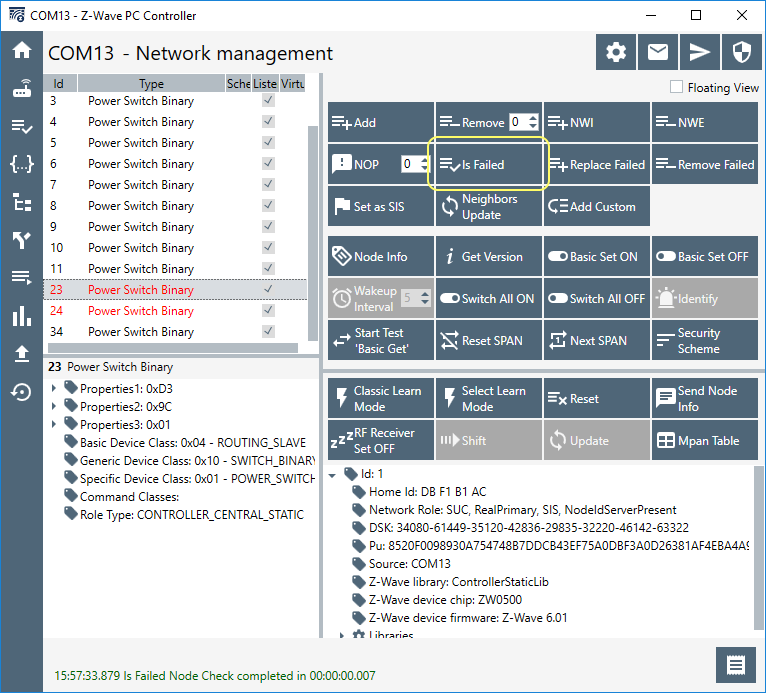
    For each remaining node, you could click on “Node Info”. This will collect more information than your controller did when it was connected on your Synology and managed by openHab.

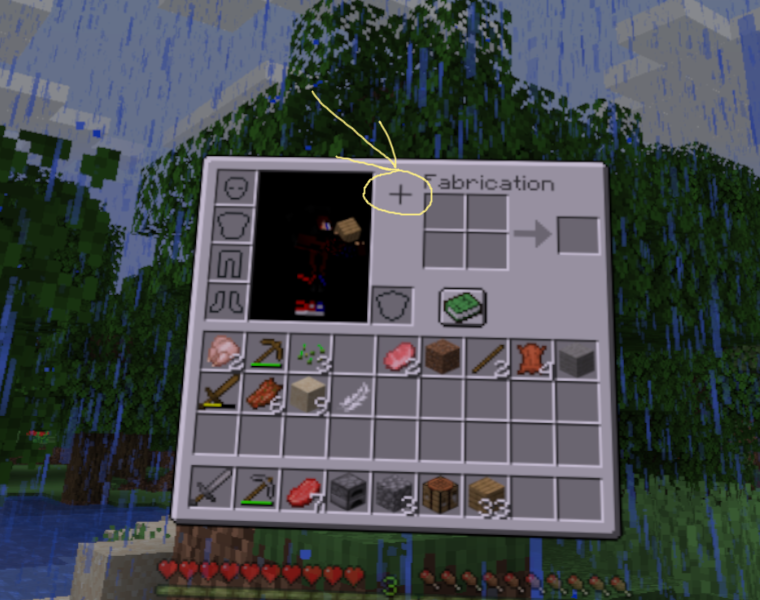
    You can add new devices easily, using the “Add” button. I did it for a Fibaro Heat Controller that I couldn’t add via openHab.

    You can test your Z-Wave Switches using “Basic Set ON” and “Basic Set OFF”.

    You can look at the topology of your mesh, using the tail “IMA Network” and by clicking on “Network Health”.

    Once you have cleaned-up your controller, you can re-plug it into your NAS.

    Unplug/Re-plug a Z-Wave Controller on a Synology

    When you remove and replug such a controller, it usually gets a new “terminal” (=a “new port”). A terminal is physically represented by a file named ‘tty…’ in the /dev folder and is the communication channel between the system (your Synology) and hardwares like the USB devices. By default, the terminal for the Z-Wave controller will be /dev/ttyACM0. But when you remove and replug it, it can get /dev/ttyACM1.

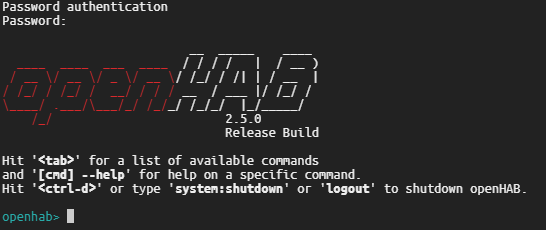
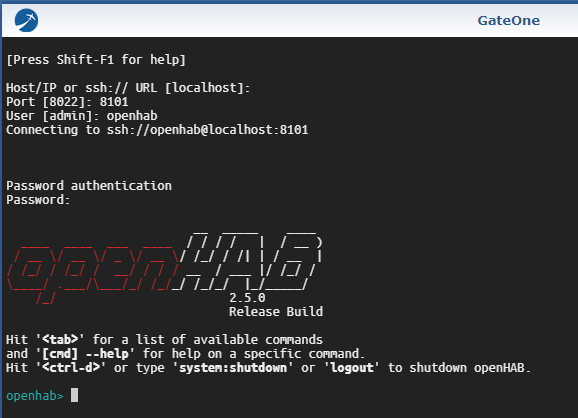
    To check which terminal is used, open a SSH console on your NAS (as explained here) and type: ls -la /dev/ttyA*

    You should get something like:
    crwxrwxrwx 1 openhab dialout 166, 1 Dec 31 14:26 /dev/ttyACM0

    If there are several terminals, unplug to Z-Wave controller, execute the command again and note the remaining names. Next, replug the controller, list again the terminals and compare the list with the one noted previously.

    If the security of the terminal is not crwxrwxrwx, then (assuming the terminal is ttyACM0) execute: sudo chmod 777 /dev/ttyACM0

    If the user is not openhab, then check first that it exists via the Control Panel of your DSM: Control Panel > User.

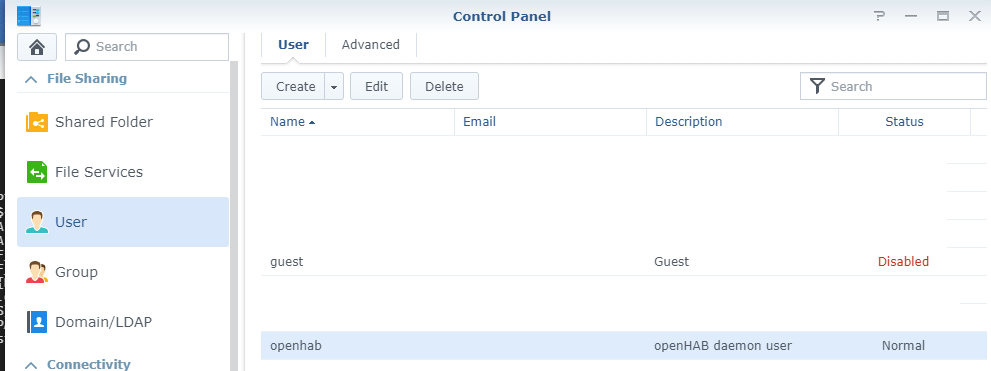
    If it does not, you have not properly installed openHab on your Synology as explained here. The package is indeed configuring everything itself. If it exists, assuming the terminal is ttyACM0, execute: sudo chown openhab /dev/ttyACM0

    If the group is not dialout, check that it exits via the Control Panel of your DSM: Control Panel > Group. Use “Edit Members” to check that the user “openhab” is in that group. NB.: a group “uucp” must also exist and contain the user “openhab”.

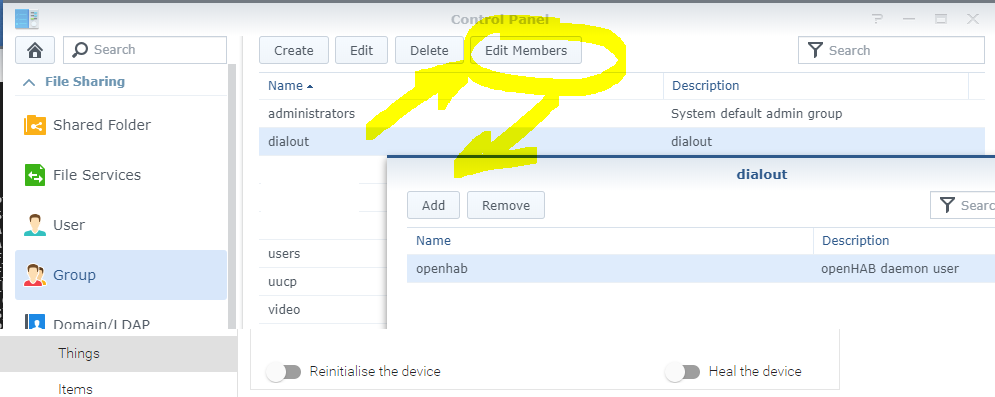
    If not, you didn’t properly install openHab on your Synology as explained here. The package is indeed configuring everything itself. If it exists, assuming the terminal is ttyACM0, execute: sudo chgrp dialout /dev/ttyACM0

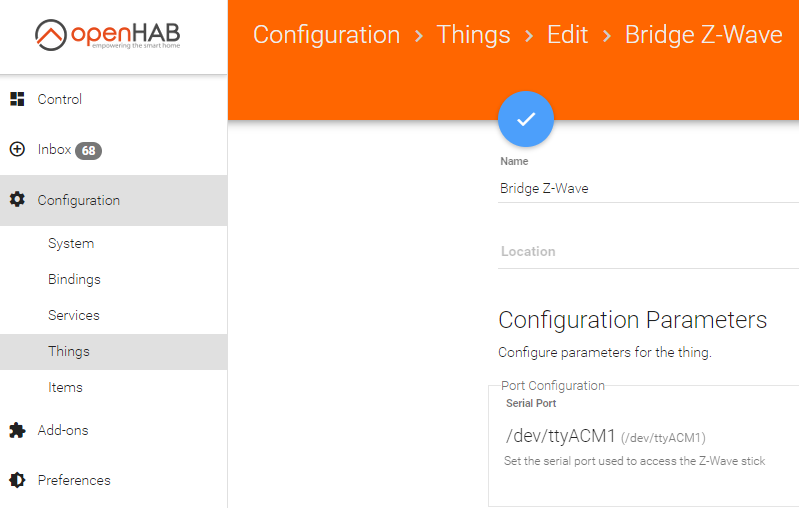
    Finally, to check that the right terminal is used by openHab to communicated with the Z-Wave Controller, go to its configuration via that PaperUI > Configuration > Things. Select your Z-Wave Controller and Edit it. In the “Port Configuration” part, you should see that the “Serial Port” is the terminal you found with the command ls -la /dev/ttyA*.

    Loading

  • Change password of OpenHab Console on Synology

    To change the OpenHab Console password, you have to edit the /userdata/etc/users.properties file.

    Click to Read More

    First, open a SSH console on your Synology as root (See here).

    Then, create a hashed password with the following command (replace ThisIsMyNewPassword with yours) :

    echo -n ThisIsMyNewPassword | sha256sum

    It should output someting like this :

    8fda687cf4127db96321c86907cbea99dabb0b13aa4bf7555655e1df45e41938 -

    If you installed openHab as explained here, the file to be edited is /openHAB/userdata/etc/users.properties in the share /SmartHome of your Synology. Copy the hashed string above (without the dash and the blank) between the {CRYPT} tags:

    # This file contains the users, groups, and roles.
    # Each line has to be of the format:
    #
    # USER=PASSWORD,ROLE1,ROLE2,...
    # USER=PASSWORD,_g_:GROUP,...
    # _g_\:GROUP=ROLE1,ROLE2,...
    #
    # All users, groups, and roles entered in this file are available after Karaf startup
    # and modifiable via the JAAS command group. These users reside in a JAAS domain
    # with the name "karaf".
    #
    openhab = {CRYPT}8fda687cf4127db96321c86907cbea99dabb0b13aa4bf7555655e1df45e41938{CRYPT},_g_:admingroup
    _g_\:admingroup = group,admin,manager,viewer,systembundles

    To test the new password, open a SSH console on openHab. As by default it may only be accessed from the localhost, the best option is to use GateOne (See here). Once logged in GateOne on your Synology, execute :

    ssh -p 8101 openhab@localhost

    You should be prompted to enter your password and, if correct, you will see:

    Type Ctrl-D to exit the openHab console.


    NB.: instead of logging in GateOne as admin, you can directly connect on openHab using the port ‘8101’ and the login ‘openhab’ in GateOne:

    Loading

  • Backup & Restore openHab 2.x on Synology

    In order to upgrade from openHab 2.4 to 2.5, I had to backup the configuration of openHab, uninstall the v2.4, install the v2.5 and restore the configuration.

    Click to Read More

    If you installed OpenHab as explained here, you can copy all the folders under /openHAB in the share /SmartHome of your Synology.

    OpenHAB 2.x currently has two different ways of setting up things:

    • Either through textual configuration (in /SmartHome/openHAB/conf folder) or
    • through the user interface which saves to a “jsonDB” database (in /SmartHome/openHAB/userdata folder).

    Both the textual configuration files and the database folders must be backuped (See here).

    OpenHab 2.x comes now with scripts to backup and restore its configuration and database. They are availabe in the folder /runtime/bin. You can access them via a SSH Console on your Synology, under /var/packages/openHAB/target/runtime/bin/ (equivalent to /volume1/@appstore/openHAB/runtime/bin)

    These scripts take care of backuping not only the files that you have manually edited in the folder /conf (items, things, scripts, …), but also everything configured via the paperUI or HABPanel and stored in the folder /userdata (habmin, jsondb,…)

    Attention, these scripts do not take care of:

    • backuping the jar files that you have installed manually. Ex.: in /addons
    • backuping the DB you would be using for, e.g., persistence, …
    • adding the openHAB user (‘openhab’) to the dialout and tty groups if you did this previously

    First, prepare your Synology

    1. Open a SSH console on your Synology as root (See here)
    2. Install the Synology Gear’s tools, required to have the command pgrep used by the restore script of openHab, typing the command :
      synogear install
    3. Modify the script ‘/runtime/bin/restore’ to replace unzip (not available anymore on Synology) by 7zip. Concretelly, replace:

    command -v unzip >/dev/null 2>&1 || {
    echo "'unzip' program was not found, please install it first." >&2
    exit 1
    }

    with

    command -v 7z >/dev/null 2>&1 || {
    echo "'7z' program was not found, please install it first." >&2
    exit 1
    }

    and 

    unzip -oq "$InputFile" -d "$TempDir" || {
    echo "Unable to unzip $InputFile, Aborting..." >&2
    exit 1
    }

    with

    7z x -y -o"$TempDir" "$InputFile" > /dev/null || {
    echo "Unable to unzip $InputFile, Aborting..." >&2
    exit 1
    }

    Next, use the following commands to backup your configurations:

    1. sudo -i
    2. cd /var/packages/openHAB/target
    3. synoservice –stop pkgctl-openHAB
    4. ./runtime/bin/backup
    5. synoservice –start pkgctl-openHAB

    You should see something like this as output:

    #########################################
    openHAB 2.x.x backup script
    #########################################

    Using '/volume1/@appstore/openHAB/conf' as conf folder...
    Using '/volume1/@appstore/openHAB/userdata' as userdata folder...
    Using '/volume1/@appstore/openHAB/runtime' as runtime folder...
    Using '/volume1/@appstore/openHAB/backups' as backup folder...
    Writing to '/volume1/@appstore/openHAB/backups/openhab2-backup-19_12_25-12_27_33.zip'...
    Making Temporary Directory if it is not already there
    Using /tmp/openhab2/backup as TempDir
    Copying configuration to temporary folder...
    Removing unnecessary files...
    Zipping folder...
    Removing temporary files...
    Success! Backup made in /volume1/@appstore/openHAB/backups/openhab2-backup-19_12_25-12_27_33.zip

    Before uninstalling openHab, if you intend to install a new version, copy the backup into a safe folder, like the tmp folder :

    cp /volume1/@appstore/openHAB/backups/openhab2-backup-19_12_25-12_27_33.zip /tmp/openhab2-backup.zip

    Finally, use the following commands to restore your configurations:

    1. sudo -i
    2. cd /var/packages/openHAB/target
    3. synoservice –stop pkgctl-openHAB
    4. ./runtime/bin/restore /tmp/openhab2-backup.zip
    5. synoservice –start pkgctl-openHAB

    You should see an output like this:

    ##########################################
    openHAB 2.x.x restore script
    ##########################################

    Using '/volume1/@appstore/openHAB/conf' as conf folder...
    Using '/volume1/@appstore/openHAB/userdata' as userdata folder...
    Making Temporary Directory
    Extracting zip file to temporary folder.

    Backup Information:
    -------------------
    Backup Version | 2.5.0 (You are on 2.4.0)
    Backup Timestamp | 19_12_25-12_27_33
    Config belongs to user | openhab
    from group | users

    Your current configuration will become owned by openhab:users.

    Any existing files with the same name will be replaced.
    Any file without a replacement will be deleted.

    Okay to Continue? [y/N]: y
    Moving system files in userdata to temporary folder
    Deleting old userdata folder...
    Restoring system files in userdata...
    Deleting old conf folder...
    Restoring openHAB with backup configuration...
    Deleting temporary files...
    Backup successfully restored!


    If opening openHab weg page immediatly, you will see that it’s restoring the UI:

    Please stand by while UIs are being installed. This can take several minutes.

    Once done, you will have access to your PaperUI, BasicUI, HabPanel, etc…

    Loading

  • Web Consoles to execute bash commands on Synology

    I am using two different Web Consoles to execute commands on my Synology : the Web Console of Nickolay Kovalev and GateOne.

    Click to Read More

    Such Web Consoles are a bit easier to launch than a ssh console via Putty (See here). They can be opened directly from the DSM of your Synology. Another advantage is that the Web Console is still valid (opened) when the PC goes to out of sleep/hibernation state.

    To use the Web Console of Nickolay Kovalev, install my Synology Package “MODS_Web_Console” available on my SSPKS server or on my GitHub

    It is very convenient to execute basic commands. But you can’t use it to run vi, ssh, and otehr commands which interact with the display, the keyboard, etc…

    To use the more advanced Web Console GateOne, install my Synology Package “MODS_GateOne” available on my SSPKS server or on my GitHub

    It is really powerful and secure. You can use it to open multiple ssh sessions, edit files with vi, etc…

    Loading

  • Devolo DLan (CPL) + Fibaro Wall Plug = network connection issues

    I notice some incompatiblity between Devolo DLan’s and Fibaro Wall Plugs

    Click to Read More

    In order to measure the power consumption of my Devolo DLan’s (a 500 Wireless+ and a 200 AV Wireless N), I did plug them into Fibaro Wall Plugs.

    It used to work fine at the begining. But now, the devices plugged on the DLan via ethernet or Wifi can’t connext to the network anymore.

    As soon as remove the Fibaro Wall Plug, everything works fine. I tried several times, with two distinct DLan, after resetting my router and my modem, after resetting the connected devices, etc… 

    I found only two other users experiencing also issues when combining Fibaro Wall Plugs and Devolo powerline devices… 

    Loading

  • Basic Authentication in subfolders with nginx on Synology

    I am using nginx as default webserver on my Synology. Here is how to configure a login/password prompt on a subfolder of the WebStation.

    Click to Read More

    First, open a SSH console on your Synology and enter the root (See here)

    Notice that you cannot change the config file of nginx (/etc/nginx/nginx.conf). Even if you do so, your changes will be removed automatically. But in the config file of nginx, for the server listening on the port of your WebStation (port 80 by default), you can see it is loading extra config named www.*.conf under the folder /usr/syno/share/nginx/conf.d/

    include /usr/syno/share/nginx/conf.d/www.*.conf;

    So, go to that folder : cd /usr/syno/share/nginx/conf.d

    There, create a password file with your login and password

    Type : htpasswd -c -b .htpasswd YourLogin YourPassword

    the parameter -c is to create the file. Only use it if the file does not yet exist otherwise you will clean its current content!!

    Look at the content if the file: cat .htpasswd

    It should be similar to this: 

    YourLogin:$apr3$hUZ87.Mo$WUHtZHjtPWbBCD4jezDh72

    Now, create and edit a file name like : www.protected.conf (Ex.: using vi)

    Assuming that you want to protect a subfolder You/Sub/Folder existing in the root of your WebStation, you should theoretically this into www.protected.conf :

    location /Your/Sub/Folder {
    auth_basic “Any Prompt Message You Want”;
    auth_basic_user_file /usr/syno/share/nginx/conf.d/.htpasswd;
    }

    Next, you have to restart nginx with the command : nginx -s reload

    Or even better to be 100% sure: synoservicecfg –restart nginx


    But for some reason, this is not working on Synology (at least on mine ?!). It seems that the block location does not work without a modifier like = or ~

    It searched for hours why it was not working, without answer. 

    For example, I tested first that the following webpage was working fine on my NAS: http://MyNas/SubFolder/index.php

    Next, I edited the www.protected.conf with the following block before restarting nginx, deleting the cache ofh my browser and restarting my browser (THIS IS MANDATORY each time one changes the location):

    location /SubFolder/index.php {
    return 301 https://www.google.be/search;
    }

    But opening http://MyNas/SubFolder/index.php didn’t return me to Google.

    Next, I tried with :

    location = /SubFolder/index.php {
    return 301 https://www.google.be/search;
    }

    And this was working! So, I thought that the path used as location was possibly was incorrect. To see the path capture as location I tried next with 

    location ~ (/SubFolder/index.php) {
    return 301 http://Fake$1;
    }

    Opening now http://MyNas/SubFolder/index.php, I got the (unvailable) page  http://Fake/SubFolder/index.php

    So, the path /SubFolder/index.php was definitively correct. 

    I think that my directive is included before another one which overwrite it. Possibly this one, found in /etc/nginx.nginx.conf:

    location / {
    rewrite ^ / redirect;
    }

    So, I have no choice but use the modifier = (exact match) or ~ (matching a regular expression). Unfortunately, doing so, another problem arise… the php pages are not reachable anymore 🙁

    If you look at the log file of nginx: cat /var/log/nginx/error.log

    You see:

    2019/11/30 21:22:12 [error] 25657#25657: *50 open() “/etc/nginx/html/SubFolder/index.php” failed (2: No such file or directory), client: 192.168.0.1, server: _, request: “GET /SubFolder/index.php HTTP/1.1”, host: “MyNas”

    This is because nginx is using its default root folder /etc/nginx/html/ instead of inheriting the one define for the WebStation.

    The solution is to simply specify the root in the location block : root /var/services/web;

    But now, instead of being executed, the php script is downloaded.. Harg !

    The following location works, by redefining the execution of the php page:

    location = /SubFolder/index.php {
      root /var/services/web;

      try_files $uri /index.php =404;
      fastcgi_pass unix:/var/run/php-fpm/php73-fpm.sock;
      fastcgi_index index.php;
      include fastcgi.conf;
    }

    Pay attention, corrupting the config of nginx will make you DSM unable to run anymore ! Always check that your config is correct with the command : nginx -t


    Ok, now, to handle both folders and php pages, one can use this variant of the location above:

    location ~ /SubFolder/ {
      root /var/services/web;

      location ~ \.php$ {
        try_files $uri /index.php =404;
        fastcgi_pass unix:/var/run/php-fpm/php73-fpm.sock;
        fastcgi_index index.php;
        include fastcgi.conf;
      }
    }

    In the sub-location above, use php73-fpm.sock, php70-fpm.sock, php50-fpm.sock, etc… according to the version of php used by default with your nginx in your WebStation !

    This is more or less working fine… I still have issues as some server variables are not passed to the php pages… But it’s working enough for my purpose. We are now only missing the basic authentication !!! Here is the final location block:

    location ~ /You/Sub/Folder/ {
      root /var/services/web;

      location ~ \.php$ {
        try_files $uri /index.php =404;
        fastcgi_pass unix:/var/run/php-fpm/php73-fpm.sock;
        fastcgi_index index.php;
        include fastcgi.conf;
      }

      auth_basic “Any Prompt Message You Want”;
      auth_basic_user_file /usr/syno/share/nginx/conf.d/.htpasswd;

    }

    Once in place, nginx restarted, your browser cleaned and restarted too, you finally got the prompt for your login and password.

    If you type a wrong login or password, you could see the error in the nginx log file: cat /var/log/nginx/error.log

    2019/11/30 17:51:47 [error] 12258#12258: *145 user “mystery” was not found in “/usr/syno/share/nginx/conf.d/.htpasswd”, client: 192.168.0.1, server: _, request: “GET /err/You/Sub/Folder/ HTTP/1.1”, host: “MyNas”

    2019/11/30 17:59:52 [error] 20130#20130: *3 user “mystery”: password mismatch, client: 192.168.0.1, server: _, request: “GET /You/Sub/Folder/ HTTP/1.1”, host: “MyNas”

    Et voilà… Not perfect, not clear why it’s not wokring out of the box as documented here… But 

    Loading

  • Configure Hue devices in OpenHab 2

    Here is how to add the Philips Hue Bridge in OpenHab and control the Hue devices (more doc here).

    Click to Read More

    Add first the Bridge Philips Hue

    Go to Paper UI’s Configuration > Bindings and click on the blue “+” (or go directly to Configuration > Add-ons, in the tab “Bindings”) :

    In the Search box, type “Hue” to filter the “Bindings”. Click on the “Install” link on the right of the “Hue Binding” to install it :

    With the Hue Binding, you can now add a “Hue Bridge”. Go to your physical “Bridge” Philips and press the button on the top as you do to pair Hue devices with the Bridge. Go next to Configuration > Things and click on the Blue “+”. Then select “Hue Binding”. OpenHab will find the “Hue Bridge” :

    Select the “Hue Bridge” and click on “Add as Thing” :

    If everything worked fine, you should see all your Hue Devices in the “Inbox”.

    Otherwise, you will probably see the “Hue Bridge” as “Offline – Configuration_Error”. This is probably due to an issue during the pairing with the physical “Bridge” Philips. OpenHab has not been authorized to access it.

    It’s possible to set the authorization manually (See Here). First, find the IP address of your “Philips Bridge” by opening the page https://discovery.meethue.com  

    You should see something like:  [{“id”:”001788fffeae5fd3″,”internalipaddress”:”xxx.xxx.xxx.xxx”}]

    Next, using the internalipaddress above, open the page http://xxx.xxx.xxx.xxx/debug/clip.html and before pressing the button “POST”, type :

    • /api/ in the “URL”
    • “{“devicetype”:”my_hue_app#openhab”}” in the “Message Body”

    In the “Command Response”, copy the value of the “username”. Go to Configuration > Things, edit the Bridge (click on the pen) and paste the value in the field “Username”

    Configure next each Philips Hue device

    You can select any of the Philips Hue devices appearing in the Inbox. Each selected device is added as a Thing (under Configuration > Things). There, you can link them with Items that you have previously defined as described here

    Extended Color Light

    If you want to configure a Thing of type “Extented Color Light”, you can look what are its supported features in the official openHab documentation for Philips Hue (here). 

    As you can see on your Thing , it has an ID like “hue:0210:001788ae5fd3:4″

    You can search for 0210 on the documentation page to find that it supports changing the color, the color temperature and being switched on/off:
     
    These features can be controlled via “Channels” (See openHab’s concepts). A distinct channel is used to control each distinct feature of a Thing. Contretely, you have to link your Thing, via the various channels, onto Items. Which kind of item must be used is also described on the documentation page :

    What is not clear in the documentation of the Channels, for example with the color Channel is that you can link not only a Color Item with it, but also a Dimmer and a Switch.

    Personnaly, if I define all my Items within a file (as described here), I configure my Devices by creating Links between my Items and my Things directly within the Paper UI interface.

    For a Extended Color Light, my Items file (default.items) will contain:

    Switch GF_Office_Light "Lampe Bureau" <light>
    Dimmer GF_Office_Light_Dim "Lampe Bureau Dim" <light>
    Color GF_Office_Light_Clr "Lampe Bureau Color" <light>
    Dimmer GF_Office_Light_Temp "Lampe Bureau Temperature" <light>

    And I configure the Links between the Thing and those Items like this :

    Finally, in my Sitemap, I will use:

    sitemap default label="Olympe Home" {
      Frame label="Rooms" icon="group" {
        Text label="Bureau" icon="groundfloor" {
          Switch item=GF_Office_Light label="Switch" icon="light"
          Slider item=GF_Office_Light_Dim label="Dim" icon="slider"
          Colorpicker item=GF_Office_Light_Clr label="Color"
          Slider item=GF_Office_Light_Temp label="Temperature" icon="slider"
        }
      }
    }

    And here is the outcome:

    Loading

  • Configure Somfy devices in OpenHab 2

    Here is how to add the SomfyTahoma Bridge in OpenHab and control the Somfy devices (more doc here).

    Click to Read More

    Go to Paper UI’s Configuration > Bindings and click on the blue “+” (or go directly to Configuration > Add-ons, in the tab “Bindings” – indeed, “Bindings” are installed using “Add-ons” developed by the community) :

    In the Search box, type “Somfy” to filter the “Bindings” and find those available for this type of devices. Click on the “Install” link on the right of the one to be installed :

    Once the Add-on installed, you can check that the Bindings is available in the Configuration > Bindings :

    With the Somfy Binding, you can now add a “SomfyTahoma Bridge”. Go to Configuration > Things and click on the Blue “+”. Then select “SomfyTahoma Binding” and next “Somfy Tahoma Bridge” :

    You must now configure the Bridge with your Somfy account (Email Address and Password). You can also define the “location” (Room) where it is placed in your house :

    Once done, the Bridge appears as “Online” in Configuration > Things

    And the “Somfy devices” will appear in the “Inbox” :

    Each device in the “Inbox” can now be linked with an “Item” previously configured via the “Home Builder” (and saved in the file “default.items”). For example, select a Roller Shutter by clicking on the blue “V”  and click next on “Add as Thing” :

    Go to Configuration > Things were the “Roller Shutter” appears now as “Online” : 

    Click on the “Roller Shutter” to configure it (For each “Thing”, when you configure it, you see one or several blue circles. Each one can be used to configure the links with the various features of the devices) :

     In the case of a Somfy Roller Shutter, there is not a lot to configure. You can only select the “Item” to be used to control the “Roller Shutter” :

    Once selected, click on “Link” :

    Here above, I configured the link with a “Item” located in the Room “Office”. So, going to the “Basic UI” via the “Welcome page”, and opening the “Office” (member of the “Ground Floor”), you can now click on the arrows “Up” and “Down” next to the “Roller Shutter” to control it :

    You can also do it via the “HabPanel DashBoard” :

    Loading

Tags


Acer iDea 510 AirPlay Android Backup DD-WRT DNS DS209+ DS713+ DS1815+ FlexRaid Galaxy Galaxy S2 Galaxy S7 Google Assistant Google Home HTPC Kies MCE MySQL Nabi 2 Nvidia TV Shield One Plus One OpenHab Outlook Philips Hue Plex RAID Raspberry PI Remote Desktop Root Access Samsung Scripts Synology Team Build Visual Studio VMWare Wi-Fi Windows Windows 8 Windows 8.1 Windows 10 Windows Server 2012 XBMC Xpenology ZigBee

Categories


Archives