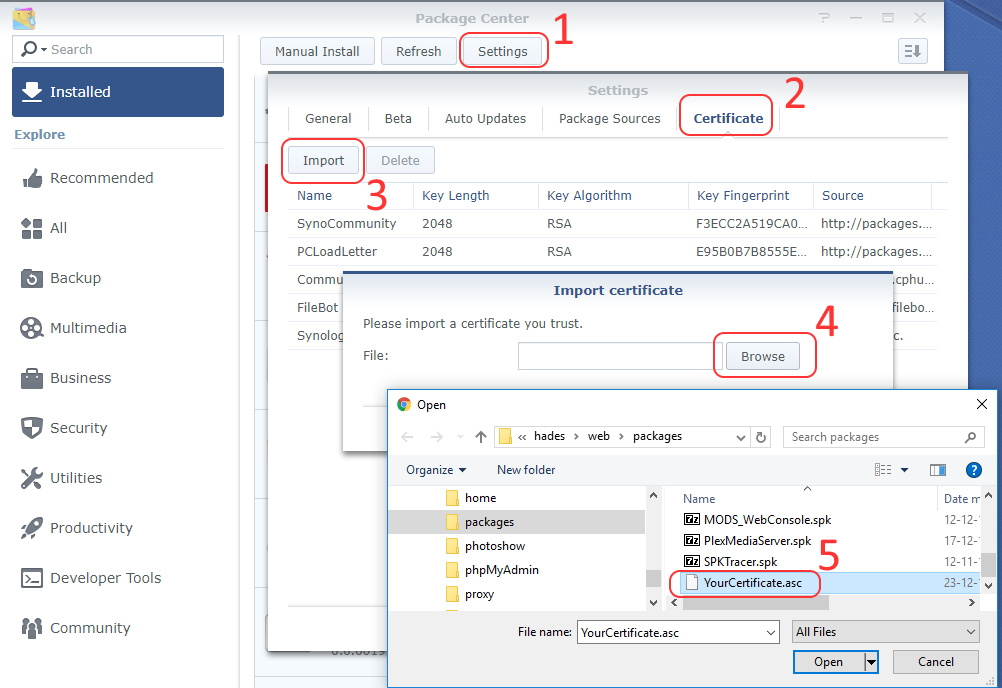
• Install the Synology Toolkit and Sign SPK packages

    Since a long time, I was waiting to have enough free time to investigate how to sign my own packages with Synology’s toolkit. It’s now finally done!

    Click to Read More

    Initial installations

    1. First, install IPKG as explained here.
    2. Next, install the official Synology package “python3
      1. Alternative: install python3 using the command: ipkg install python3
    3. Then, create a symlink into /usr: ln -s /usr/local/bin/python3 /usr/bin/python3
      1. if using python installed with ipkg, create a symlink into /usr: ln -s /opt/bin/python3 /usr/bin/python3
    4. install gpg using the command: ipkg install gpgme
      1. This was needed as gpg was installed on my NAS without gpg-agent (? to be investigated later)…
    5. Now, install GIT as explained here.
    6. Finally run:
      1. cd /volume1/
        1. There was not enough free space in the system partition to install the toolkit!!
      2. mkdir -p toolkit
      3. cd toolkit/
      4. git clone https://github.com/SynologyOpenSource/pkgscripts-ng pkgscripts
      5. cd pkgscripts/

    If you want to use the toolkit for other purpose than signing

    You can check the available platform for your DSM version in the toolkit (e.g. here for 6.1). Run : ./EnvDeploy -v 6.1 --list

    It should display a list like this one:

    Available platforms: 6281 alpine alpine4k armada370 armada375 armada38x armadaxp avoton braswell broadwell bromolow cedarview comcerto2k dockerx64 evansport grantley hi3535 kvmx64 monaco qoriq x64 rtd1296 denverton apollolake

    • N.B.: The major and minor version (E.g. 6.1 for major=6 and minor =1) of your DSM can be found using: cat /etc.defaults/VERSION
    • N.B.: the platform of your Synology can be found in this list based on your model (See the column “Package Arch”). The model of your Synology can be found running the command:  cat /etc.defaults/synoinfo.conf | grep -m 1 ‘upnpmodelname’ | cut -d “=” -f 2
    • N.B.: You can also check the CPU of your Synology using: cat /proc/cpuinfo | grep -m 1 ‘model name’ | cut -d “:” -f 2 | cut -d “@” -f 1

    And you can configure the toolkit by running the following command with your DSM version (E.g.: 6.1) and platform (E.g.: avoton) as parameter: ./EnvDeploy -v 6.1 -p avoton

    • NB: the platform must be in lower case !!!

    In order to sign packages

    You have to create a GPG key. Type: /opt/bin/gpg2 --gen-key

    Once prompted, choose:

    • RSA and RSA (default)
    • key size 1024, 2048 or 4096
    • key does not expire
    • And do not type any passphrase. Just press ‘Enter’ without typing any character until it accepts to not make your key secure.

    gpg (GnuPG) 2.0.18; Copyright (C) 2011 Free Software Foundation, Inc.
    This is free software: you are free to change and redistribute it.
    There is NO WARRANTY, to the extent permitted by law.

    Please select what kind of key you want:
    (1) RSA and RSA (default)
    (2) DSA and Elgamal
    (3) DSA (sign only)
    (4) RSA (sign only)
    Your selection? 1
    RSA keys may be between 1024 and 4096 bits long.
    What keysize do you want? (2048) 2048
    Requested keysize is 2048 bits
    Please specify how long the key should be valid.
    0 = key does not expire
    <n> = key expires in n days
    <n>w = key expires in n weeks
    <n>m = key expires in n months
    <n>y = key expires in n years
    Key is valid for? (0) 0
    Key does not expire at all
    Is this correct? (y/N) y

    GnuPG needs to construct a user ID to identify your key.

    Real name: vletroye
    Email address: <obfuscated>
    Comment: BeatificaBytes’ Packages
    You selected this USER-ID:
    “vletroye <obfuscated>”

    Change (N)ame, (C)omment, (E)mail or (O)kay/(Q)uit? O
    You need a Passphrase to protect your secret key.

    You don’t want a passphrase – this is probably a *bad* idea!
    I will do it anyway. You can change your passphrase at any time,
    using this program with the option “--edit-key”.

    We need to generate a lot of random bytes. It is a good idea to perform
    some other action (type on the keyboard, move the mouse, utilize the
    disks) during the prime generation; this gives the random number
    generator a better chance to gain enough entropy.
    We need to generate a lot of random bytes. It is a good idea to perform
    some other action (type on the keyboard, move the mouse, utilize the
    disks) during the prime generation; this gives the random number
    generator a better chance to gain enough entropy.
    gpg: key 9ABC9981 marked as ultimately trusted
    public and secret key created and signed.

    gpg: checking the trustdb
    gpg: 3 marginal(s) needed, 1 complete(s) needed, PGP trust model
    gpg: depth: 0 valid: 1 signed: 0 trust: 0-, 0q, 0n, 0m, 0f, 1u
    pub 2048R/9C293482 2017-12-23
    Key fingerprint = 4AB4 051C EF8D 009D 4BF3 D78F EEBC 5B44 9C29 3481
    uid vletroye (BeatificaBytes’ Packages) <obfuscated>
    sub 2048R/4C18D693 2017-12-23

    You can now:

    • view public keys using: gpg2 --list-keys
    • view private keys using: gpg2 --list-secret-keys
    • delete a private key: gpg2 --delete-secret-key <user name> (you can also use the <email> or <key id>, displayed after pub xxxxR/ where xxxx is the keysize, e.g.: 1024)
      • Ex.: gpg2 --delete-secret-key vletroye
      • Ex.: gpg2 --delete-secret-key 9C293482
    • delete a public key: gpg2 --delete-key <user name>
    • You can also use specific rings (Ex.: if you did copy them somewhere else than the default user’s home folder : ~/.gnupg)
      • gpg2 --no-default-keyring --secret-keyring /root/.gnupg/secring.gpg --list-keys
      • gpg2 --no-default-keyring --secret-keyring /root/.gnupg/secring.gpg --list-secret-keys
      • gpg2 --no-default-keyring --keyring /root/.gnupg/secring.gpg --list-keys
      • gpg2 --no-default-keyring --keyring /root/.gnupg/secring.gpg --list-secret-keys

    And last but not least… you can finally sign a package located e.g. under /web/packages, using: php CodeSign.php --sign=/volume1/web/packages/YourPackage.spk --keydir=/root/.gnupg --keyfpr=9C293482

    Now that this package is signed, add your certificate into the list of trusted publishers within your Synology’s Package Center.

    1. First, run: gpg2 --armor --export <user name> > YourCertificate.asc
    2. Next copy this one into a public shared folder. E.g.: cp YourCertificate.asc /volume1/web/packages/
    3. Finally:
      1. import it: Package Center > Settings > Certificate > Import > Browse >
      2. and only trust Synology Inc. and trusted publishers: Package Center > Settings > General
    Import Certificate
    Import Certificate
    Trusted Publishers
    Trusted Publishers


    Instead of manually importing your certificate as illustrated above, if you are using SSPKS to distribute your packages, you can copy it there: cp YourCertificate.asc /var/services/web/sspks/gpgkey.asc

    Doing so, it will automatically be added as a trusted publisher for anyone who is adding your SSPKS url in his list of “Package Sources”.


    Loading

  • Find Synology information using Shell commands

    The model of your Synology can be found running the command:  cat /etc.defaults/synoinfo.conf | grep -m 1 ‘upnpmodelname’ | cut -d “=” -f 2

    The CPU of your Synology can be found using: cat /proc/cpuinfo | grep -m 1 ‘model name’ | cut -d “:” -f 2 | cut -d “@” -f 1

    The version of your DSM can be found using: cat /etc.defaults/VERSION

    Loading

  • Download all Images from Imgur’s account for backup reasons

    I have been looking for a quite long hour how to download all images from my Imgur account.

    The solution is damn stupid simple: use the button “Download account images” in the “Settings” page.

    Click to Read More

    Download Imgur Images
    Download Imgur Images

    This button will download a zip file with all your images…

    To download a public album, of any user, you can also simply use MyJdownloader 😉

    Loading

  • Plex Server not found after Synology update to DSM 1.10.1.4602

    After updating DSM on my Synology, Plex Media Player was not able to find the Plex Server running there.

    Plex Server Not Found

    Click to Read More

    Plex Server was clearly running as I was able to connect via http://<My Synology>:32400/web/index.html

    But it was not responding to any request to display Libraries or to play any Movies… To solve this, I had to :

    1. Stop the package Plex via the DSM Package Center
    2. Log in my NAS as an administrator, in a SSH console, via Putty and enter root mode.
    3. Find Plex process still running via the command: ps -gaceux | grep plex
      1. This command displayed: plex 13150 0.2 0.2 677640 17832 ? Sl Dec17 7:41 Plex Media Server
    4. Kill plex’s remaining process: kill -9 13150
    5. Possibly do also delete the Plex’s Plugin Service as done here.
    6. Start the package Plex via the DSM Package Center

    Et voilà.

    IMO, the problem was that I didn’t stop properly Plex Package before updating my DSM. The Plex instance running at that time apparently didn’t completely shutdown. But it was not really running fine anymore either. Unfortunately, that instance was preventing a new one to start (as it was still using the port 32400).

    Loading

  • Batch Convert SVG to PNG

    Conversion SVG

    The easiest way to convert a bunch of svg images into png: ConversionSVG + InkScape

    Click to Read More

    It’s very straightforward and the quality is much better than various online tools

    • Install first InkScape and next ConversionSVG.
    • Run ConversionSVG,
    • Select the output “Format”  = .PNG,
    • Select the “Exportation Zone” = Dessin
    • Set the desired “Size” for the output images.
    • Select the “Folder” containing the svg images to be converted
    • Select bellow the target folder to store the converted images.
    • Click “Convert

    Et voilà 😉

    Loading

  • A Switch to share 4 USB 3.1 devices with 4 PC

    I currently have a USB Switch ATEN US224. I would like to upgrade it with the ATEN US434

    Aten US434 Image

    Click to Read More

    Briefly said, I would be able to share 4 USB 3.1 devices with 4 PC instead of sharing 4 USB 2.0 devices with 2 PC.

    I.e.: Currently I have this (Aten US224):

    And I would like this, which is close to 90€ (Aten US434):

    There is also a cheaper version, named Aten US424, to share 4 usb 2.0 with 4 PC:

    Edit 28/05/2019 I got the Aten US424.

    Loading

  • Plex Media Server not matching/downloading metadata anymore

    Since a few days, My Plex Media Server, hosted on my Synology, was not able to match movies anymore. And when matching movies manually, it was sometimes downloading the covers but never the metadata. Deleting the Service plugin solved the problem.

    Click to Read More

    I read that IPV6 could be the cause of such a problem, and that turning it off on the Synloloy was the solution. I tried that but without success.

    Was solved my problem was to:

    1. Stop Plex via the DSM’s Package Manager
    2. Log in my NAS as an administrator, in a SSH console, via Putty and enter root mode.
    3. Enter Plex’s Plugin folder using a command like: cd /volume1/Plex/Library/Application\ Support/Plex\ Media\ Server/Plug-ins/
    4. Delete the service plugin:  rm -R Services.bundle
    5. Restart Plex via the DSM’s Package Manager

    Loading

  • How to capture a Synology Package during installation

    I recently discovered GateOne, a free HTML5 web-based terminal emulator and SSH client for which there is a Package for Synology on the SynoCommunity. Unfortunately, the setup doesn’t work anymore on the most recent DSM versions. As SynoCommunity prevents users to manually download their SPK, I did recover it from Synology’s temp download in order to fix myself the issues reported here and recreate a package.

    [EDIT 30/12/2018] I have posted a new version of this script here.

    Click to Read More

    So, as one cannot manually download the Synology package (SPK file), the idea is to simply capture the SPK during its installation (even if that installation fails).

    First, log into a SSH console via putty and enter root mode.

    Create the following script, named ‘capture.sh’

    #!/bin/bash
    VOLUME=$1
    TARGET=$2

    if [ -z “$VOLUME” ]; then
    echo “usage: capture <source VOLUME> <target dir>”
    exit 0
    fi

    if [ -z “$TARGET” ]; then
    echo “usage: capture <source VOLUME> <target dir>”
    exit 0
    fi

    pattern=”volume[0-9]+”
    if [[ ! $VOLUME =~ $pattern ]]; then
    echo “The name of the source volume must be like ‘volume<i>’ where <i> is numeric”
    exit 0
    fi

    if [ ! -d “/$VOLUME/@tmp” ]; then
    echo “Temporary dir not found: /$VOLUME/@tmp”
    exit 0
    fi

    if find “/$VOLUME/@tmp/” -mindepth 1 -print -quit | grep -q .; then
    rm -R /$VOLUME/@tmp/*
    fi

    echo “Press any key to stop the capture”

    if [ -t 0 ]; then stty -echo -icanon -icrnl time 0 min 0; fi

    count=0
    keypress=”
    while [ “x$keypress” = “x” ]; do
    let count+=1
    echo -ne $count’\r’
    keypress=”`cat -v`”
    cp -R “/$VOLUME/@tmp” “$TARGET/SynoCapture”
    done

    if [ -t 0 ]; then stty sane; fi

    echo “$count captures done”
    exit 0

    This script will

    1. first, delete the temporary folder from the volume where you will install the package to be captured. Ex.: /volume1/@tmp
    2. next, loop until you press any key. And during the loop, it will copy any (new) content from the temporary folder into a folder named ‘SynoCapture’ on a target shared folder. Ex.: on your NAS’ web folder /var/services/web/

    So, concretely,

    1. Run the script via a command like: ./capture volume1 /var/services/web/
    2. Install your package via the package manager
    3. Stop the script by pressing any key once the package has been installed
    4. (You may now uninstall your package)

    Voilà, first step accomplished. Now, look into your capture (Ex.: in \\<Your NAS>\web\SynoCapture\).

    1. You should see a folder named “@synopkg\@download\<Package>”. This folder contains the package but without its file extension .spk (Ex.: @SYNOPKG_DOWNLOAD_<Package>).  Gotcha !!!
    2. You should also see a folder named “pkginstall”. This one contains the package deflated.
    3. Now, a little extra… you should also find a folder name “pkglist.tmp” containing two files: synoserver.enu and : otherserver.enu (with possibly other extensions depending on your DSM language?). Those files contains the URL’s of all SPK available respectively on the official Synology website and on the various SPK servers that you configured in your Package Center > Settings > Package Sources.

    If you are running Windows 10 with Powershell, copy the content of those files into on file named input.txt and open a powershell in the folder where you have saved that input.txt file. Execute next this to filter the file and extract the URL’s:

    select-string -Path input.txt -Pattern ‘http[^”]*\.spk[^”]*’ -AllMatches | % { $_.Matches } | select-object Value > output.txt

    You can copy/paste the content of output.txt into MyJDownloader (asking for a “deep link analysis”!). Magic !

    Loading

  • WordPress RewriteRule to “Redirect” after moving the blog

    I did reconfigure my Synology Web Stations to access my blog directly at www.beatificabytes.be instead of www.beatificabytes.be/wordpress/. The problem was to redirect next the old pages still referenced by google onto their new address. Ex.: www.beatificabytes.be/wordpress/softwares onto www.beatificabytes.be/softwares. Using a RewriteRule did the trick.

    Click to Read More

    Concretely, I did configure a Virtual Host in the Web Station

    WebStation VirtualHost

    Next, I did reconfigure wordpress’s wp-config.php by replacing:

    define(‘WP_HOME’,’/wordpress’);
    define(‘WP_SITEURL’,’/wordpress’);
    define(‘WP_SITEURL’, $pageURL . ‘/wordpress’);

    with:

    define(‘WP_HOME’,’https://www.BeatificaBytes.be’);
    define(‘WP_SITEURL’,’https://www.BeatificaBytes.be’);
    define(‘WP_SITEURL’, $pageURL’);

    Finally, I did remove “/wordpress” from all URL’s in my own posts. I didn’t use a Search & Replace plugin like the “Better Search and Replace” to do the update directly in the database. Instead, I did use the plugin “Broken Link Checker” to Bulk Edit broken URLs.

    Bulk Edit Broken URLIt took more time but was a much more “clean” approach as I only touched for sure broken links. (Notice: This Plugin runs in the background so you need patience for it to get the complete list of broken URLs. What’ really great is that for broken external links, it suggests the replacement by an archived version of the missing pages – via the WayBack Machine)

    WayBack Machine

    NB.: Here is another nice trick to list all broken URL’s in a website

    wget --spider -o /var/log/wget.log -e robots=off -w 1 -r -p http://<youraddress>

    Finally, I had to redirect all old pages still referenced on Google to their new location. The obvious solution was to use a RewriteRule to be added in the .htaccess file used by WordPress (In my case, in /var/services/web/wordpress/.htaccess). Unfortunately, it took me hours to find the trick as, instead of reading the whole apache’s RewriteEngine documentation, I tried to figure out myself how to do it, based on samples found on the web.

    Finally, I read these french documentations:

    And it’s only by reading the documentation about the flag that I understood the need to use the special flag [R] (I already tried at least more than 20 various rules before understanding I had to specify the flag R(edirect)…)

    So, here it is: RewriteRule ^wordpress/(.*)$ /$1 [R,L]

    • Match any path starting with “wordpress/” and followed by “anything else”
    • Replace it with the part matching “anything else”
    • And if a match was found, do a R(edirect) and this was the L(ast) rule to apply (i.e.: stop).

    I didn’t change anything else. Also, changes in the .htaccess are taken into account immediately, without the need to restart the WebStation.

    # Synology PHP
    AddHandler default-handler .htm .html .shtml
    AddHandler php-fastcgi .php
    AddType text/html .php
    Action php-fastcgi /php56-fpm-handler.fcgi
    # Synology PHP

    # BEGIN WordPress
    <IfModule mod_rewrite.c>
    RewriteEngine On
    RewriteBase /
    RewriteRule ^wordpress/(.*)$ /$1 [R,L]
    RewriteRule ^index\.php$ – [L] RewriteCond %{REQUEST_FILENAME} !-f
    RewriteCond %{REQUEST_FILENAME} !-d
    RewriteRule . /index.php [L] </IfModule>

    # END WordPress

    Et voilà.

    NB.: Here is a useful website to test online .htaccess RewriteRule’s

    Loading

  • Synology Package Sample to illustrate how scripts and wizards are executed

    I had troubles to use variables in various scripts or to create wizards via shell scripts. So I have created a dummy package logging useful information in a file to understand what’s going on during the installation, the upgrade and the uninstallation of a Synology Package.

    Click to Read More

    This package is named MODS SPK Tracer and is available on my SPK Server. Obviously, i has been created with my Synology Package Creator tool for Windows 😉

    Once installed, upgraded or removed (and obviously reinstalled), you can access its log file either by clicking on its icon in DSM’s Main Menu, or by via the Package Center.

    Mods SPK Tracer

    This package comes with shell scripts creating on the fly “installation”, “upgrade” and “uninstallation” wizard (install_uifile.sh, uninstall_uifile.sh, upgrade_uifile.sh). The purpose is to illustrate how to inject environment variables in the JSON wizard and how to use php in such scripts. Briefly said, they must generate a JSON wizard and store it in the standard log file $SYNOPKG_TEMP_LOGFILE

    While testing those wizard scripts, I have discovered that, at runtime, only the running script is stored in the temporary folder. The other ones are not available. No way therefore to call another script from the running one.

    The Wizards are exporting one variable to the installation scripts, for illustration purpose (I.e.: how to prompt the user for some input to be used later by the scripts)

    Finally, the wizard scripts also logs the environment variables exported for them by the DSM. Not a lot are available during the execution of the wizard because the SPK is actually not yet expanded.

    The package comes next with the standard installation scripts, calling all a generic script that log the environment variables exported for them by the DSM. So, you can see in which script you have access to which variable. The scripts preinst, postinst, preuninst, postuninst, preupgrade and postupgrade have access to the same variables. But it’s not the case for the start-stop-status script.

    Those scripts are also displaying info during the installation/upgrade/uninstallation process for the user. For that purpose, they write in the standard log file $SYNOPKG_TEMP_LOGFILE. Obviously the wizard scripts can’t use this trick to display information to the user. But they don’t need that as they actually display real screens (rendition of their JSON).

    Notice: often, variables accessible for a script must be persisted in a file to be retrieved later by another script. Ex.: the postinst script can store a variable received from the install_uifile wizard in a file so it can be read by the postupgrade or postuninst script later.

    Notice: the log file is only available in the Package Center if its path is returned by the start-stop-status script.

    Notice: the INFO file of this Package is quite standard.

    What’s interesting is to see the order of execution. Ex.: for an upgrade

    SPK Tracer order

    Also, during an upgrade, the script to stop, preuninst and postuninst are the versions of the previous package, not the versions of the new package !!! (Obviously).

    During an upgrade, preupgrade and preinst scripts are executed from a temporary folder (/volume1/@tmp/pkginstall/scripts), while postupgrade, postinst, and the script to start, are executed from the target installation directory (/var/packages/<Package Name>/scripts)

    Loading

Tags


Acer iDea 510 AirPlay Android Backup DD-WRT DNS DS209+ DS713+ DS1815+ FlexRaid Galaxy Galaxy S2 Galaxy S7 Google Assistant Google Home HTPC Kies MCE MySQL Nabi 2 Nvidia TV Shield One Plus One OpenHab Outlook Philips Hue Plex RAID Raspberry PI Remote Desktop Root Access Samsung Scripts Synology Team Build Visual Studio VMWare Wi-Fi Windows Windows 8 Windows 8.1 Windows 10 Windows Server 2012 XBMC Xpenology ZigBee

Categories


Archives