• Use opkg instead of ipkg on Synology

    IPKG is not maintained anymore since 2014. As a replacement, one can use Entware, which offers more than 1800 packages.

    Click to Read More

    First enter a SSH session on your nas as root (See here).

    Check if your CPU model is a armv5, armv7, mips, x86-32 or x86-64. You can do so with one of the following command:

    • cat /proc/cpuinfo | grep -m 1 ‘model name’ | cut -d “:” -f 2 | cut -d “@” -f 1
    • uname -a

    Create now a folder to install Entware (NB.: The folder /opt may not yet exist. I.e.: Optware may not be installed yet. We will delete it if it exists. If it cannot be deleted – you could have a message that it’s in use – then reboot your Synology first).

    mkdir -p /volume1/@entware-ng/opt
    rm -rf /opt
    ln -sf /volume1/@entware-ng/opt /opt

    Depending on your CPU, execute one of the following commands

    • For armv5: wget -O – http://pkg.entware.net/binaries/armv5/installer/entware_install.sh | /bin/sh
    • For armv7: wget -O – http://pkg.entware.net/binaries/armv7/installer/entware_install.sh | /bin/sh
    • For mips: wget -O – http://pkg.entware.net/binaries/mipsel/installer/installer.sh | /bin/sh
    • For x86-32: wget -O – http://pkg.entware.net/binaries/x86-32/installer/entware_install.sh | /bin/sh
      For x86-64: wget -O – http://pkg.entware.net/binaries/x86-64/installer/entware_install.sh | /bin/sh

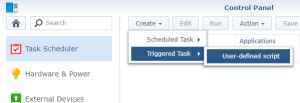
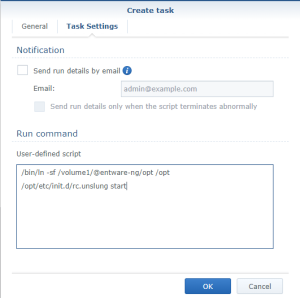
    Go now to your DSM and open the “Control Panel”. There, select the “Task Scheduler” > “Create” > “Triggered Task” > “User-defined script”

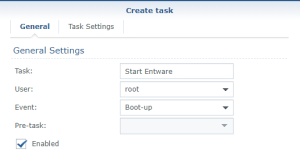
    Configure this new task to run at “Boot-up” :

    And to run the following commands:

    /bin/ln -sf /volume1/@entware-ng/opt /opt
    /opt/etc/init.d/rc.unslung start

    Finally, to include /opt/bin and /opt/sbin to the PATH variable, add . /opt/etc/profile at the end of /etc/profile with this command:

    echo “. /opt/etc/profile” >> /etc/profile

    You can now use the command opkg. The first action to do is: opkg update

    Check the list of packages available with: opkg list | more


    NB.: To remove IPKG from your Synology:

    1. umount /opt
    2. rm -R /opt
    3. rm -R /volume1/opt or rm -R /volume1/@optware (depends on where IPKG was installed)
    4. delete every reference to optware in /etc/rc.local
    5. rm /etc/rc.optware
    6. check that there is nothing related to ipkg in /etc/crontab
    7. reboot your NAS

    Loading

  • Fix SD card or Memory of external devices not visible

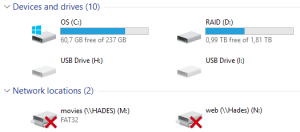
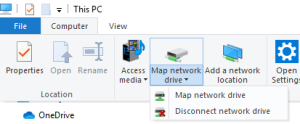
    Recently, I plugged on my PC various devices having an internal SD card or an internal Memory. And although I could hear the typical sound made by Windows when a device is plugged in, no new Drive appeared in Windows Explorer. The problem was with a Mounted Network Share using the same letter as the one assigned by Windows to the new Drive.

    Click to Read More

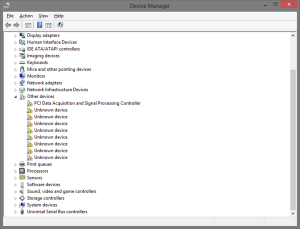
    Looking into the “Device Manager” console, I didn’t see any devices not recognized as illustrated here under. So, the device was correctly recognized and its drivers correctly installed.

    I tried different USB cables and different USB ports (both 2.0 and 3.0), but without success either.

    Finally, I opened the “Computer Management” Console and looked into the “Disk Management” part. There I saw a Drive greyed out. I noticed that it was assigned with a letter which was actually used by a Mounted Network Drive. I did simply right click on it to “change Drive letter” with another one and it appeared magically into the Windows Explorer. 

    To be complete, I have to mention that the conflicting Mounted Network Drive was not available and all letters between C: and the one used for the Mounted Network Drive where in use . This was maybe the actual root cause of Windows assigning the same letter to a new USB Drive.

    Et voilà.

    Loading

  • Retrieve files and folders from a Synology C2 backup

    My Nas Synology died recently and I wanted to retreive some content from my Synology C2 Backup.

    Click to Read More

    After 3 years being 24/7, my DS1815+ does not turn on anymore when I press the power button. The problem is not with the power supply. I did change it, but with no luck.

    Fortunatelly, I was using Hyper Backup to daily compy everything into “Synology C2 backup”. 

    But it’s not possible to retreive a complete foder from the backup via the Synology C2 web page. One can only download file by file 🙁

    To download a complete folder at once, you need the “Synology Hyper Backup Explorer” for desktop available in the Destkop Utilities section of the downloads.

    Loading

  • How to change the langage of the “Samsung Account” webpage

    When I visit my account on the website of Samsung, it is always displayed in Dutch (used in Brussels, my location) instead of French (my language).

    Click to Read More

    Setting the language “French (European)” in my profile is not fixing this issue. The solution is to change the language on this membership page.

    Loading

  • How to link Google Home with Devices managed via an External Service

    I couldn’t find anymore where one can link Google Assistant with External Services in the Google Home App. Seems like Google changed the way to access the menu for that purpose in their App.

    Click to Read More

    Once in Google Home, click on the “Account” icon at the bottom right.

    Next, click on the Gear icon “Settings”

    Select the Tab “Assistant” and in there, the “Home Control”

    And here, you can click on the blue “+” at the bottom right.

    And here we are:

    Loading

  • Setup DSM 6.2.2 in a Virtual Synology DS3617xs using VMWare

    Here is a step by step “How-To create a Virtual Machine to emulate a DS3617xs running DSM 6.2.2” using VMWare and Xpenology

    Click to Read More

    Xpenology is a bootloader for Synology’s operating system which is called DSM. It can be used to setup DSM on a PC or in a Virtual Machine like VirtualBox or VMWare.

    I am using VMWare 15. But any version from VMWare 11 should work.


    1: Download and unzip this package, containing:

    • the configuration of the virtual machine (dsm.ovf, dsm.vmx, disk.vmdk and synoboot.vmdk),
    • the xpenology boot file for DS3617xs (synoboot.img) and
    • the image of the DSM 6.2.2 for DS3617xs (DSM_DS3617xs_23739.pat)

    Notice that only the image “23739” is compatible with the boot file (Jun’s loader 1.03b).

    2: Open VMWare Workstation. If you never configured the default location where you want to create your Virtual Machines, press CTRL-P to open the “Preferences” panel. There, set this default location (I am using D:\VMWare).

    3: Go next to “Windows Explorer”, in the folder where you have unzipped the package, and double click dsm.ovf. This is going to import the VM into VMWare. Type a name for the new virtual machine (I am using DSM3617 6.2.2) and click “Import”.

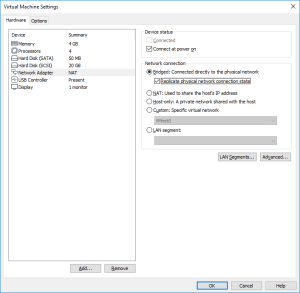
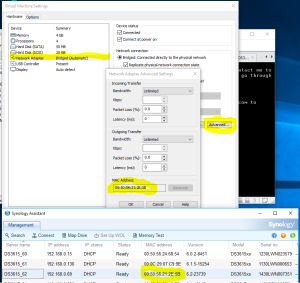
    4: Here is the outcome to the importation. You can now click on “Power on this virtual machine”. But first, be ready to type F2 in the console to enter the Bios. You will have only 2 seconds to do so!

    5: As soon as you have run the VM, click into it to capture the keyboard, and press “F2”. If you missed it, the VM will try to boot from the network. In such a case restart the VM and try again! Once in the Bios, go to the Boot tab and swap the SATA Hard Disk with  the SCSI Hard disk. The VM has indeed to boot with the SATA disk containing the boot loader. Finally, Save and Exit the Bios. The VM will reboot.

    6: Again, quickly click into it to capture the keyboard and press the “down arrow” to select the loader for “VMWARE/ESXI” (attention, you don’t have a lot of time to start the selection). Press next Enter and the boot will load. The VM is ready to install the DSM image.

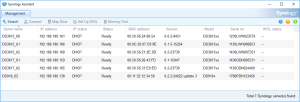
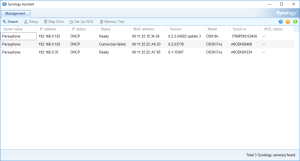
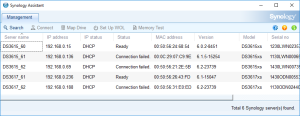
    7: Open the “Synology Assistant”, which is more efficient than the page http://find.synology.com to find your VM, and after 1 minute click on “Search”. If you didn’t wait long enough, you will see an Error message (In such a case, click Search “Again”. I never had to do this more than 3 times).

    8: Finally, the Assistant will find your VM. A webpage should automatically open (Otherwise, right click on the VM and select “Install”). Click on “Set up” in that page.

    9: Click next on the link “Manual Install”.

    10: Click on Browse to select the image of the DSM 6.2.2 for DS3617xs and select the file “DSM_DS3617xs_23739.pat” in the folder when you unzipped the package downloaded here previously.

    11: Finally, click on “Install Now” and confirm that the installation can override the disk… it’s the virtual SCSI Hard Disk member of the VM. No worry 😉

    12: The installation will take a few minutes and once completed, you will see in the VMWare Workstation that the VM is rebooting.

    13: On the installation page, you see a count down. If you want to check the status of the VM, you can go back to the Synology Assistant and Click Search. You should see that it’s restarting, etc… and is finally ready. At that moment, you can select the VM and click Connect.

    14: You will now be able to login into the VM and configure it. DO NOT select “Install the latest DSM version automatically” or “Install the important updates of DSM automatically”!!! The image 37739 is the latest compatible with the loader used by this VM. Upgrading your DSM will break the VM.


    15: You have now a DS3617xs with the DSM 6.2.2-23739.

    16: DO NOT upgrade or the disk will disappear and the VM won’t work anymore (Someone mentions that mounting the Disk on a SATA controller instead of a SCSI one helped… See here. But it didn’t work for me). Looking into the Synology Assistant, you would see that the Virtual Synology is not configured.

    17: It’s now time to use the SCSI Hard Disk to create a first Volume. Open the DSM Main Menu and start the Storage Manager. Go to “Storage Pool” and click “Create”. Use the HDD of 20GB. Next, go to “Volume” and click “Create”. Use the “Storage Pool” created previously.

    18: Now, you can upgrade the VM to your version of VMWare. Shutdown the DSM Properly (via the menu on the Buddy Icon in the top-right corner). The VM will soon stop.


    19: Once the VM stopped, upgrade it by clicking on “Upgrade this virtual machine”.

    Et voilà !

    Loading

  • Setup DSM 6.2.2 in a Virtual Synology DS918+ using VMWare

    Here is a step by step “How-To create a Virtual Machine to emulate a DS918+ running DSM 6.2.2” using VMWare and Xpenology

    Click to Read More

    Xpenology is a bootloader for Synology’s operating system which is called DSM. It can be used to setup DSM on a PC or in a Virtual Machine like VirtualBox or VMWare.

    I am using VMWare 15. But any version from VMWare 11 should work.


    1: Download and unzip this package, containing:

    • the configuration of the virtual machine (dsm.ovf, dsm.vmx, disk.vmdk and synoboot.vmdk),
    • the xpenology boot file for DS918+ (synoboot.img) and
    • the image of the DSM 6.2.2 for DS198+ (DSM_DS918+_24922.pat)

    2: Open VMWare Workstation. If you never configured the default location where you want to create your Virtual Machines, press CTRL-P to open the “Preferences” panel. There, set this default location (I am using D:\VMWare).

    3: Go next to “Windows Explorer”, in the folder where you have unzipped the package, and double click dsm.ovf. This is going to import the VM into VMWare. Type a name for the new virtual machine (I am using DSM918 6.2.2) and click “Import”.

    4: Here is the outcome to the importation. You can now click on “Power on this virtual machine”. If you want, you may also first increase the Memory, the Processors or the size of the SCSI Hard Disk (Do not touch the SATA Hard Disk which contains the boot loader).

    5: As soon as you have run the VM, click into hit to let it capture the keyboard, and press the “down arrow” to select the loader for “VMWARE/ESXI” (attention, you don’t have a lot of time to start the selection). Press next Enter and it will boot.

    6: Open the “Synology Assistant”, which is more efficient than the page http://find.synology.com to find your VM, and after 1 minute click on “Search”. If you didn’t wait long enough, you will see an Error message (In such a case, click Search “Again”. I never had to do this more than 3 times).

    7: Finally, the Assistant will find your VM. A webpage should automatically open (Otherwise, right click on the VM and select “Install”). Click on “Set up” in that page.

    8: Click next on the link “Manual Install”.

    9: Click on Browse to select the image of the DSM 6.2.2 for DS918+ and Select the file “DSM_DS918+_24922.pat” in the folder where you unzipped the package downloaded here previously.

    10: Finally, click on “Install Now” and confirm that the installation can override the disk… it’s the virtual SCSI Hard Disk member of the VM. No worry 😉

    11: The installation will take a few minutes

    12: Once the installation complete, you will see in the VMWare Workstation that the VM is rebooting. On the installation page, you see a countdown. If you want to check the status of the VM, you can go back to the Synology Assistant and Click Search. You should see that it’s restarting, installing patches, reconnecting and finally ready. At that moment, you can select the VM and click Connect.

    13: You will now be able to login into the VM and configure it.

    14: It’s now time to use the SCSI Hard Disk to create a first Volume. Open the DSM Main Menu and start the Storage Manager.

    15: Go to Volume and click Create. Select the HDD of 20GB, etc…

    16: You have now a brand new DS918+ with the DSM 6.2.2-24922 Update 3.

    17: Now, you can upgrade the VM to your version of VMWare. Shutdown the DSM Properly (via the menu on the Buddy Icon in the top-right corner). The VM will soon stop.

    18: Once the VM stopped, upgrade it by clicking on “Upgrade this virtual machine”.

    Et voilà !

    Loading

  • Get audio via AV port and video via HDMI on a Yamaha HTR-4067

    I have connected the DVI output of my PC on a HDMI input of my Yamaha HTR-4067 but was missing the sound. I solved that issue by connecting the S/PDIF output of my sound card on an AV port the Yamaha and “combining” both HDMI and AV.

    Click to Read More

    Theoretically, one should be able to have music via the DVI port of a PC by using an adequate DVI to HDMI adapter (19 pins). But my problem is that my internal sound card is dead and I am using an external one. The easiest for me was therefore:

    1. to connect that external sound card directly on the AV1 port of the Yamaha, using an optical cable.
    2. to select on the Yamaha Remote the HDMI input to be displayed
    3. to click on “Option” on the Yamaha Remote to configure the “Audio Input”
    4. and select “AV1” as “Audio Input”

    Notice that one can select a different “Audio Input” for each HDMI input.

    Loading

  • How to use an Alias as “From” field with IMAP account in Outlook 2016

    Nobody knows the mail address of my actual mailbox. Instead, I always communicate an alias (for example: Me @ BeatificaBytes.be).

    Unfortunately, with the latest update of Outlook 2016, to use such an alias as “From” is not a piece of cake anymore… The trick is to use the good old “Mail” tool of the Control Panel.

    Click to Read More

    The reason for me to use an alias is that this alias is forwarded to a “gmail” mailbox, where the antispam is quite efficient. And gmail transfers the remaining emails to my actual mailbox (on my own server/within my own domain).

    I access next my actual mailbox via IMAP with Outlook. I never use the intermediary mailbox on gmail.

    With the latest version of Outlook 2016, I couldn’t configure a different mail address than the “user account” of my actual mailbox (which is the mail address that I want to keep secret 😉 ).


    I.e.: if I type Me @ BeatificaBytes.be in the config screen above, outlook will use that both for the “From” Field and as user account to connect onto my IMAP server.

    This is an issue as the alias Me @ BeatificaBytes.be is not valid as an account to connect on my actual mailbox.

    Obviously, I could configure Outlook with my actual account and define next my alias as a Reply Address. But than, the recipient would see my actual mail address.

    The easiest is to use to good old “Mail” tool:

    1. Open it via the Windows Control Panel > User Account > Mail (Microsoft Outlook 2016).
    2. There, click the “Email Accounts…”
    3. In the tab “Email”, click “New”…
    4. And here we go!

    As usually:

    1. Select the option “Manual setup or …” and click “Next”
    2. Select “Pop or IMAP” and click “Next”
    3. Type your name and your alias email address in the user information part
    4. Use your actual email address as user name in the logon information part (this is the ‘option’ never proposed by the new configuration wizard of Outlook 2016)

    Et voilà…

    Loading

  • How to add Rooms into several Home structures managed with Google Home

    Since I have defined several “home” structures in the App “Google Home”, I can only add new rooms in the last one created.

    Google Support told me that the only way to workaround that limitation was to delete all the homes, except the one to be completed, and re-create the others later.

    Click to Read More

    First, let me explain why I have created several home structure in the App “Google Home”: I wanted to grant my kids access on only a subset of the devices (lights, google home mini, chrome casts, blinds, …)

    So, I have created

    • a “Main” home with all the devices that I may access,
    • a “Kid 1” and a “Kid 2” to grant each kid access on his own devices (lights, blinds) and
    • a “Common” to grant everyone access to the common devices (TV, speakers, Google Home Mini).

    I have shared each “Kid” home with its owner and the “Common” home with everyone.

    Here is the standard way to add a room into a home when one has only one home (Thx to Thomas Ott):

    1. OPEN: Google Home (on a mobile device)
    2. CLICK: “Account” icon (lower right corner – looks like a person in a circle)
    3. CLICK: “Settings” (small gear)
    4. CLICK: The “Assistant” tab (between Personal info & Services)
    5. CLICK: “Home control”
    6. CLICK: “Rooms” tab (to the right of “Devices”)
    7. CLICK: The + button (lower right corner)
    8. PICK: An existing room name (or skip to Step 9)
    9. SCROLL: To the bottom of the screen
    10. CLICK: “Custom name”
    11. TYPE: The name of the new custom room
    12. PRESS: “OK”
    13. SELECT: One or more DEVICES by clicking on one or more checkboxes
    14. CLICK: Check Mark symbol at the upper right of the screen to save the new room & device(s)
    The advantage of grouping the devices into rooms is that you can simultaneously turn all of them on/off by saying the sentence:  “Hey, Google: Turn off(on) the lights in <the name of the room>”. If your Google Assistant in also assigned to that room, you can even skip the name of the room in that sentence.
    But since I have defined several homes, when I want too add new rooms in the home “Main”, they are news added into the home “Common”.
    I did contact the online support of Google to find how to do it properly. As always, they did their best to understand my specific case and suggest appropriate solutions. Unfortunately here, they could only suggest to delete all the homes except the “Main”, add next the missing rooms, and then recreate the other homes. It seems that there is indeed no “feature” to add rooms into a specific home for the moment (Can you believe that ???).
    Fortunately, I am hardheaded: I did search for an alternative to delete/recreate/reassign 10th of rooms/devices… and I found one. Using that workaround, I was able to create rooms in any of the existing homes.
    1. OPEN: Google Home (on a mobile device)
    2. CLICK: “Home” icon (lower left corner – looks like a house)
    3. SELECT: the home structure where you want to create a new room (at the top of the screen)
    4. SCROLL DOWN: to the very bottom of the screen. If you devices in a section “Linked to you – x devices not in home”, then go to §A here under – otherwise go to §B.

    A: if you have devices not yet assigned to any home, you can use it to create a new room into which that device will be automatically moved:

    1. CLICK: any not-unassigned device.
    2. CLICK: The “Add to a room” button (at the bottom of the screen)
    3. PICK: an existing “Home” where you want to create a new room
    4. CLICK: The “Next” button (lower right corner)
    5. CLICK: The “Move device” button (lower right corner)
    6. CLICK: “Add a custom room…” (scroll down the screen to find the “Create New” section) or any predefined name you would like to create
    7. CLICK: The “Next” button (lower right corner)
    8. EDIT: The name of the new room
    9. CLICK: “Continue” (lower right corner)

    You can loop on this § A to create one room for each device not yet assigned.

    B: if all your devices are already assigned to a home, use anyone to create a new room into which that device will be automatically moved and move the device back to the right room later.

    1. CLICK: any device already assigned to an existing room.
    2. CLICK: “Settings” (small gear in the upper right corner)
    3. CLICK:
      1. “Home” if you want to create a room in another home. Then go to step 3 of the §A here above
      2. “Room” if you want to create a room in current home. Then go to step 4 of this §B
    4. CLICK: “Add a custom room…” (scroll down the screen to find the “Create New” section) or any predefined name you would like to create
    5. EDIT: The name of the new room
    6. CLICK: “Save” (upper right corner)

    Once the new room created, the device being now assigned to that room, you must move it back to its original location (or loop first on this § B to create all the new required rooms).

    1. CLICK:
      1. “Home” if you want to move back the device into another home. Then go to §B.1.
      2. “Room” if you want to move back the device into another room of the same home. Then go to §B.2.

    B.1.:

    1. PICK: an existing “Home”
    2. CLICK: The “Next” button (lower right corner)
    3. CLICK: The “Move device” button (lower right corner)
    4. PICK: an existing “Room”
    5. CLICK: The “Next” button (lower right corner)

    B.2.:

    1. PICK: an existing “Room”
    2. CLICK: The “Save” button (upper right corner)
    Notice that you can empty rooms by moving the devices to other rooms. But a device can’t be removed from all rooms once it has be assigned once. This feature is also not supported…

    Loading

Tags


Acer iDea 510 AirPlay Android Backup DD-WRT DNS DS209+ DS713+ DS1815+ FlexRaid Galaxy Galaxy S2 Galaxy S7 Google Assistant Google Home HTPC Kies MCE MySQL Nabi 2 Nvidia TV Shield One Plus One OnePlus One OpenHab Outlook Philips Hue Plex RAID Raspberry PI Remote Desktop Root Access Samsung Scripts Synology Team Build Visual Studio VMWare Wi-Fi Windows Windows 8 Windows 8.1 Windows 10 Windows Server 2012 XBMC Xpenology

Categories


Archives